
user manual

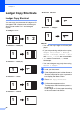


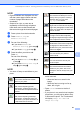

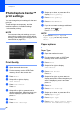
Table Of Contents
- Advanced User’s Guide MFC-J4510DW MFC-J4710DW
- User's Guides and where do I find them?
- Table of Contents
- 1 General setup
- 2 Security features
- 3 Sending a fax
- Additional sending options
- Additional sending operations
- Sending a 2-sided fax from the ADF (MFC-J4710DW)
- Sending a fax manually
- Sending a fax at the end of a conversation
- Dual Access (Black & White only)
- Broadcasting (Black & White only)
- Real Time Transmission
- Overseas Mode
- Delayed Faxing (Black & White only)
- Delayed Batch Transmission (Black & White only)
- Checking and canceling waiting jobs
- Polling overview
- 4 Receiving a fax
- 5 Dialing and storing numbers
- 6 Printing reports
- 7 Making copies
- Copy options
- Stop copying
- Changing copy quality
- Enlarging or reducing the copied image
- Making N in 1 copies or a poster (Page Layout)
- 2 in 1 ID Copy (Page Layout)
- Sorting copies using the ADF
- Adjusting Density
- Ink Save Mode
- Thin Paper Copy
- Book Copy
- Watermark Copy
- Remove Background Color
- 2-sided copying (MFC-J4510DW)
- 2-sided copying (MFC-J4710DW)
- Saving copy options as a Shortcut
- Ledger Copy Shortcuts
- Copy options
- 8 PhotoCapture Center™: Printing photos from a memory card or USB Flash memory drive
- 9 Printing photos from a camera
- A Routine maintenance
- B Glossary
- Index
- brother USA/CAN

Chapter 8
62
j Adjust the red frame around your photo.
The part inside of the red frame will be
printed.
Press + or - to enlarge or reduce the
frame size.
Press a, b, d or c to move the
position of the frame.
Press to rotate the frame.
Press OK when you have finished
adjusting the frame setting.
Press OK to confirm.
NOTE
If your photo is very small or has irregular
proportions, you may not be able to crop
or enhance the photo. The Touchscreen
will display Image Too Small or
Image Too Long.
k Enter the number of copies you want,
either by pressing + or - or using the dial
pad on the Touchpanel.
Press OK.
l Do one of the following.
Press Print Settings to change
the print settings. (See page 64.)
If you do not want to change any
settings, press Start to print.
Slide Show 8
You can view all your photos on the
Touchscreen using Slide Show. You can
also choose a photo during the operation.
a Open the media slot cover.
b Put the memory card or USB Flash
memory drive in the correct slot.
c Press Photo.
d Swipe left or right to display
Slide Show.
e Press Slide Show.
Press OK.
f Do one of the following:
If you want to change the time to
show each photo, press
Show Each Photo for.
Swipe up or down, or press a or b to
display 3Secs, 10Secs, 30Secs,
1Min or 5Mins, and then press the
option you want to set.
If you want to change the effect,
press Effect.
Press Slide In, Fade In,
Zoom In or Off.
If you do not want to change the
settings, press Start.
g Press to finish Slide Show.