
user manual
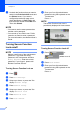

Table Of Contents
- Advanced User’s Guide MFC-J4510DW MFC-J4710DW
- User's Guides and where do I find them?
- Table of Contents
- 1 General setup
- 2 Security features
- 3 Sending a fax
- Additional sending options
- Additional sending operations
- Sending a 2-sided fax from the ADF (MFC-J4710DW)
- Sending a fax manually
- Sending a fax at the end of a conversation
- Dual Access (Black & White only)
- Broadcasting (Black & White only)
- Real Time Transmission
- Overseas Mode
- Delayed Faxing (Black & White only)
- Delayed Batch Transmission (Black & White only)
- Checking and canceling waiting jobs
- Polling overview
- 4 Receiving a fax
- 5 Dialing and storing numbers
- 6 Printing reports
- 7 Making copies
- Copy options
- Stop copying
- Changing copy quality
- Enlarging or reducing the copied image
- Making N in 1 copies or a poster (Page Layout)
- 2 in 1 ID Copy (Page Layout)
- Sorting copies using the ADF
- Adjusting Density
- Ink Save Mode
- Thin Paper Copy
- Book Copy
- Watermark Copy
- Remove Background Color
- 2-sided copying (MFC-J4510DW)
- 2-sided copying (MFC-J4710DW)
- Saving copy options as a Shortcut
- Ledger Copy Shortcuts
- Copy options
- 8 PhotoCapture Center™: Printing photos from a memory card or USB Flash memory drive
- 9 Printing photos from a camera
- A Routine maintenance
- B Glossary
- Index
- brother USA/CAN
Chapter 2
10
Dial pad restriction 2
a Press .
b Press All Settings.
c Swipe up or down, or press a or b to
display Fax.
d Press Fax.
e Swipe up or down, or press a or b to
display Dial Restriction.
f Press Dial Restriction.
g Press Dial Pad.
h Press Enter # Twice, On or Off.
i Press .
Address Book restriction 2
a Press .
b Press All Settings.
c Swipe up or down, or press a or b to
display Fax.
d Press Fax.
e Swipe up or down, or press a or b to
display Dial Restriction.
f Press Dial Restriction.
g Press Address Book.
h Press Enter # Twice, On or Off.
i Press .
NOTE
If you combine Address Book numbers
when dialing, the address will be
recognized as Dial Pad input and will not
be restricted.
Shortcut restriction 2
a Press .
b Press All Settings.
c Swipe up or down, or press a or b to
display Fax.
d Press Fax.
e Swipe up or down, or press a or b to
display Dial Restriction.
f Press Dial Restriction.
g Press Shortcuts.
h Press Enter # Twice, On or Off.
i Press .
LDAP Server restriction 2
a Press .
b Press All Settings.
c Swipe up or down, or press a or b to
display Fax.
d Press Fax.
e Swipe up or down, or press a or b to
display Dial Restriction.
f Press Dial Restriction.
g Press LDAP Server.
h Press Enter # Twice, On or Off.
i Press .