
user manual
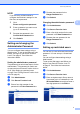
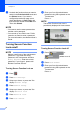

Table Of Contents
- Advanced User’s Guide MFC-J4510DW MFC-J4710DW
- User's Guides and where do I find them?
- Table of Contents
- 1 General setup
- 2 Security features
- 3 Sending a fax
- Additional sending options
- Additional sending operations
- Sending a 2-sided fax from the ADF (MFC-J4710DW)
- Sending a fax manually
- Sending a fax at the end of a conversation
- Dual Access (Black & White only)
- Broadcasting (Black & White only)
- Real Time Transmission
- Overseas Mode
- Delayed Faxing (Black & White only)
- Delayed Batch Transmission (Black & White only)
- Checking and canceling waiting jobs
- Polling overview
- 4 Receiving a fax
- 5 Dialing and storing numbers
- 6 Printing reports
- 7 Making copies
- Copy options
- Stop copying
- Changing copy quality
- Enlarging or reducing the copied image
- Making N in 1 copies or a poster (Page Layout)
- 2 in 1 ID Copy (Page Layout)
- Sorting copies using the ADF
- Adjusting Density
- Ink Save Mode
- Thin Paper Copy
- Book Copy
- Watermark Copy
- Remove Background Color
- 2-sided copying (MFC-J4510DW)
- 2-sided copying (MFC-J4710DW)
- Saving copy options as a Shortcut
- Ledger Copy Shortcuts
- Copy options
- 8 PhotoCapture Center™: Printing photos from a memory card or USB Flash memory drive
- 9 Printing photos from a camera
- A Routine maintenance
- B Glossary
- Index
- brother USA/CAN

Chapter 2
8
d Uncheck the functions that you want to
restrict in the Print Activities boxes and
the Others boxes. If you want to
configure the maximum page count,
check the On box in Page Limit, and
then enter the number in the Max. box.
Then click Submit.
NOTE
• You cannot use the same password as
another user’s password.
• You can set up one Public user. Public
users do not need to enter a password.
For more information, see Network User’s
Guide.
Turning Secure Function
Lock on/off 2
NOTE
Make a careful note of the administrator
password. If you enter the wrong
password, the Touchscreen will show
Wrong Password. Enter the correct
password. If you forget it, please call
Brother Customer Service.
Turning Secure Function Lock on 2
a Press .
b Press All Settings.
c Swipe up or down, or press a or b to
display General Setup.
d Press General Setup.
e Swipe up or down, or press a or b to
display Function Lock.
f Press Function Lock.
g Press Lock OffiOn.
h Enter your four-digit administrator
password using the keyboard on the
Touchscreen.
Press OK.
NOTE
The Secure Function Lock icon is
prominently displayed in Home screen.
Turning Secure Function Lock off 2
a Press or
(where xxxxx is
the user’s name).
b Press Lock OniOff.
c Enter your four-digit administrator
password using the keyboard on the
Touchscreen.
Press OK.
Public
XXXXX