
user manual
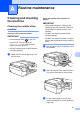
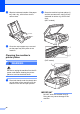
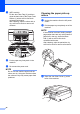
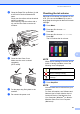
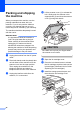
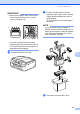
Table Of Contents
- Advanced User’s Guide MFC-J450DW MFC-J470DW MFC-J475DW DCP-J152W
- User's Guides and where do I find them?
- Table of Contents
- 1 General setup
- 2 Security features (MFC models)
- 3 Sending a fax (MFC models)
- 4 Receiving a fax (MFC models)
- 5 Dialing and storing numbers (MFC models)
- 6 Printing reports
- 7 Making copies
- Copy options
- Stop copying
- Improving copy quality
- Enlarging or reducing copies
- Making N in 1 copies or a poster (Page Layout)
- 2 in 1 ID copy (Page Layout)
- Sorting copies
- Adjusting Density
- Remove Background Color
- 2-sided copying (MFC models)
- Setting your changes as the new default
- Restoring all settings to the factory settings
- Copy options
- A Routine maintenance
- B Glossary
- Index
- brother USA/CAN

42
Packing and shipping
the machine
A
When you transport the machine, use the
packing materials that came with your
machine. If you do not pack the machine
correctly, any damage that may occur in
transit may not be covered by your warranty.
The machine should be adequately insured
with the carrier.
IMPORTANT
It is important to allow the machine to
“park” the print head after a print job.
Listen carefully to the machine before
unplugging it to make sure that all
mechanical noises have stopped. Not
allowing the machine to finish this parking
process may lead to print problems and
possible damage to the print head.
a Unplug the machine from the AC power
outlet.
b Place both hands under the plastic tabs
on both sides of the machine to lift the
scanner cover into the open position.
Then unplug the machine from the
telephone wall jack and take the
telephone line cord out of the machine.
c Unplug the interface cable from the
machine, if it is connected.
d Lift the scanner cover (1) to release the
lock. Gently push the scanner cover
support down (2) and close the scanner
cover (3) using both hands.
CAUTION
Be careful not to pinch your fingers when
the scanner cover closes.
e Open the ink cartridge cover.
f Press the ink release levers to release
the ink cartridges, and then take out the
ink cartridges. (See Basic User’s Guide:
Replacing the ink cartridges.)
g Install the orange protective part, and
then close the ink cartridge cover.
3
3
1
2