
Instruction Manual


Document ID 996434
!
Page 4 of 9
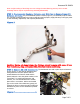
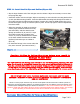
STEP 6: Remove Side Fairings: The locations of the bolts and quick rivets holding the fairings
in place are illustrated (Figure 6 A, B, C, D, & E). Details are provided below:
• A quick rivet is located in the lower nose of front fairing, behind the front tire, and holds the left and
right panels together. Using a thin blade screwdriver lift the center of the rivet head. Then pull the
rivet from the bodywork. This will release the right panel from the left panel.
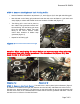
• Remove the quick rivet at location 10 (Figure 6 A). Use a pin or small hex head wrench to push the
center of the quick rivet inward. Then remove the rivet using a small flat head screwdriver.
• Remove the 2 quick rivets at locations 11 and 12, next to the turn signal (Figure 6 B). Use a pin or
small hex head wrench to push the center of the quick rivet inward. Then remove the rivet using a
small flat head screwdriver.
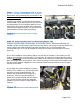
• Remove the side fairing fasteners & washers at locations 13, 14, 15, & 16 (Figure 6 C) on the right
fairing panel.
• Remove the fastener at location 17 (Figure 6 D).
• The side fairing is now connected to the front nose fairing with only hooks and slots (Figure 6 E).
Gently slide the side fairing rearward to separate it from the front nose fairing.
• Note that the turn signal wiring is connected to the wiring harness using a quick disconnect. When
removing the mid-fairing take care not to damage the connector.
• Repeat for the left side lower fairing.
Figure 6 A Figure 6 B
Figure 6 C Figure 6 D