
Technical data


ServerIron ADX Advanced Server Load Balancing Guide 105
53-1002435-03
Sample configurations
2
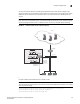
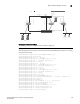
As shown in Figure 25, some clients’ web browsers are configured to use proxy IP address
209.157.22.2, while other client’s web browsers are not configured to use a proxy server. You can
configure the ServerIron ADX to satisfy both sets of clients.
Follow the steps given below to configure Proxy Server Cache Load Balancing.
1. Add the cache servers as customary, using the server cache-name <string> <ip-addr>
command.
2. Add the HTTP ports and configure port-specific health check parameters at the Cache Server
level, using the port http | <num> commands.
3. Create the proxy virtual IP address (VIP) and bind the HTTP ports of the cache servers to the
VIP. Use the server virtual-name-or-ip <string> <ip-addr> and bind… commands.
4. Add the cache servers to a cache group using the server cache-group 1 command.
5. Save the configuration changes to the startup-config file using the write memory command.
NOTE
If you have already configured your cache servers and cache group, you do not need to change their
configuration. You only need to add the VIP for the proxy and bind the HTTP ports to it, then save the
changes.
To configure the ServerIron ADX for the example shown in Figure 25 on page 104, enter the
following commands on the ServerIron ADX.
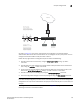
Internet
Cache-Server1
209.157.22.26
Cache-Server2
209.157.22.27
SI
Client browers A, B, and C
do not use a proxy address.
RAS
BAR
AB
C
D
E
F
The ServerIron transparently switches
client requests for web site IP addresses
to a cache server based on the hash mask.
Client browsers D, E, and F
are configured to use proxy address
209.157.22.2
The ServerIron receives requests
from these clients on the VIP, which
is configured as the proxy server.
The ServerIron then load balances
the requests to the cache servers.