
Home Theater Server User Manual

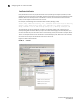
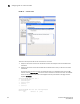
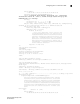
Table Of Contents
- Contents
- About This Document
- Network Security
- TCP SYN attacks
- IP TCP syn-proxy
- Granular application of syn-proxy feature
- Syn-def
- No response to non-SYN first packet of a TCP flow
- Prioritizing management traffic
- Peak BP utilization with TRAP
- Transaction Rate Limit (TRL)
- Understanding transaction rate limit
- Configuring transaction rate limit
- Configuring the maximum number of rules
- Saving a TRL configuration
- Transaction rate limit command reference
- Global TRL
- TRL plus security ACL-ID
- security acl-id
- Transaction rate limit hold-down value
- Displaying TRL rules statistics
- Displaying TRL rules in a policy
- Displaying IP address with held down traffic
- Refusing new connections from a specified IP address
- HTTP TRL
- Overview of HTTP TRL
- Configuring HTTP TRL
- Displaying HTTP TRL
- Display all HTTP TRL policies
- Display HTTP TRL policy from index
- Display HTTP TRL policy client
- Display HTTP TRL policy starting from index
- Display HTTP TRL policy matching a regular expression
- Display HTTP TRL policy client index (MP)
- Display HTTP TRL policy client index (BP)
- Display HTTP TRL policy for all client entries (BP)
- Downloading an HTTP TRL policy through TFTP
- HTTP TRL policy commands
- Logging for DoS Attacks
- Maximum connections
- clear statistics dos-attack
- Maximum concurrent connection limit per client
- Firewall load balancing enhancements
- Syn-cookie threshhold trap
- Service port attack protection in hardware
- Traffic segmentation
- DNS attack protection
- Access Control List
- How ServerIron processes ACLs
- Default ACL action
- Types of IP ACLs
- ACL IDs and entries
- ACL entries and the Layer 4 CAM
- Configuring numbered and named ACLs
- Modifying ACLs
- Displaying a list of ACL entries
- Applying an ACLs to interfaces
- ACL logging
- Dropping all fragments that exactly match a flow-based ACL
- Enabling ACL filtering of fragmented packets
- Enabling hardware filtering for packets denied by flow-based ACLs
- Enabling strict TCP or UDP mode for flow-based ACLs
- ACLs and ICMP
- Using ACLs and NAT on the same interface (flow-based ACLs)
- Displaying ACL bindings
- Troubleshooting rule-based ACLs
- IPv6 Access Control Lists
- Network Address Translation
- Syn-Proxy and DoS Protection
- Understanding Syn-Proxy
- Configuring Syn-Proxy
- DDoS protection
- Configuring a security filter
- Configuring a Generic Rule
- Configuring a rule for common attack types
- Configuring a rule for ip-option attack types
- Configuring a rule for icmp-type options
- Configuring a rule for IPv6 ICMP types
- Configuring a rule for IPv6 ext header types
- Binding the filter to an interface
- Clearing DOS attack statistics
- Clearing all DDOS Filter & Attack Counters
- Logging for DoS attacks
- Displaying security filter statistics
- Address-sweep and port-scan logging
- Secure Socket Layer (SSL) Acceleration
- SSL overview
- SSL acceleration on the ServerIron ADX
- Configuring SSL on a ServerIron ADX
- Basic SSL profile configuration
- Advanced SSL profile configuration
- Configuring Real and Virtual Servers for SSL Termination and Proxy Mode
- Configuration Examples for SSL Termination and Proxy Modes
- SSL debug and troubleshooting commands
- Displaying socket information

148 ServerIron ADX Security Guide
53-1002440-03
Configuring SSL on a ServerIron ADX
6
Converting a PFX file to a P12 file
To convert a PFX file to a P12 file on a Windows machine, change the extension from .PFX to .P12
Converting a PFX file to a PEM file
To convert a PFX file to a PEM file on a Windows machine, follow these steps:
1. If you do not have it installed, download and install the Win32 OpenSSL package from the URL
described under “Converting certificate formats”.
2. Create a folder C:\certs and copy the file yourcert.pfx into the c:\certs folder
3. Open a command prompt and change into the GnuWin32\bin directory:
cd %ProgramFiles%\GnuWin32\bin
4. Type the following command to convert the PFX file to an unencrypted PEM file (all on one line):
openssl pkcs12 -in c:\certs\yourcert.pfx -out c:\certs\yourcert.pem –nodes
Importing keys and certificates
You can import keys and certificates to and from a ServerIron ADX. Generally you export a CSR
(certificate signing request) from a ServerIron ADX, have it signed by a CA, and import it back into
the ServerIron ADX.
You also need the import and export functionality if you want to use client-authentication to
transfer the CA certificate to a ServerIron ADX.
The ServerIron ADX supports SCP protocol for transferring keys and certificates. An internal SCP
server is provided and must be enabled before any transfer. A ServerIron ADX only responds to
transfer requests initiated by remote clients.
Enabling an SCP server
The SCP server relies on the SSH protocol. SCP is enabled by default. But, you need to enable SSH
first to generate the SSH key.
If the SSH server is not enabled, take the following steps to enable it.
1. Configure a domain name as shown. In this example, "www.mydomain.com" is configured as
the domain name.
ServerIronADX(config)# ip dns domain-name www.mydomain.com
2. Create a username. In this example, "secret" is configured as the username.
ServerIronADX(config)# username admin password secret
3. Enable SCP.
ServerIronADX(config)# crypto key generate dsa
4. Allow empty SSH passwords.
ServerIronADX(config)# ip ssh permit-empty-passwd ye
Detailed descriptions of the commands used in this procedure are described in the following
manual: ServerIron ADX Administration Guide.