
Technical data


Brocade ServerIron ADX Advanced Server Load Balancing Guide 15
53-1003441-01
SIP SLB over UDP
1
Configuring a SIP virtual server
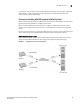
Complete the following steps to configure SIP SLB virtual redirect-proxy servers and virtual proxy
domains, and bind real servers to virtual servers.
1. Configure a virtual proxy domain name and IP address for Domain 1 and enter the virtual
server configuration mode.
ServerIronADX(config)#server virtual-name-or-ip proxy-domain-1 10.1.6.9
Syntax: [no] server virtual-name-or-ip name ip address
2. Specify the SIP port and SIP switch.
ServerIronADX(config-vs-proxy-domain-1)#port sip sip-switch
Syntax: [no] port sip sip-switch
This command must be used to enable the SIP switch for the virtual port.
NOTE
You can specify the logical SIP port number 5060 or the keyword sip.
3. Configure a domain and specify a SIP domain name and dummy user.
ServerIronADX(config-vs-proxy-domain-1)#port sip sip-user-name sipuser
domain-name domain-1
Syntax: [no] port sip [sip-user-name user-name [domain-name domain-name]]
NOTE
The domain name is optional. If you do not specify a domain name, the server IP address is
used.
4. Bind the real SIP registrar servers.
ServerIronADX(config-vs-proxy-domain-1)#bind sip registrar-1 sip registrar-2
sip
Syntax: bind sip registrar-name bind sip registrar-name sip
5. Bind the real SIP proxy servers.
ServerIronADX(config-vs-proxy-domain-1)#bind sip proxy-server-1 sip
proxy-server-2 sip
6. Return to global configuration mode.
ServerIronADX(config-vs-proxy-domain-1)#exit
Configuring health check
SIP health check can be performed by either the SIP REGISTER or OPTIONS method. Configure the
method according to your needs. The default method is REGISTER.
To configure SIP health check correctly, you must configure the sip-domain-name and dummy-user
at the virtual port level. SIP health check can be enabled at Layer 7 using UDP or TCP as the
transport layer.