
Technical data


28 ServerIron ADX Graphical User Interface Guide
53-1002412-01
High Availability
5
The Summary page displays the list of configured VIP groups, 30 entries at a time. Each entry in the
list includes the name of the group, configured interface, and the number of VIPs in that group.
3. Click New at the bottom of the VIP Groups page.
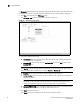
The VIP Group - new page tab is displayed, as shown in Figure 12.
FIGURE 12 Configuring a VIP group
4. Provide the following information:
• VIP Group ID: Enter the identifier for the VIP group that includes multiple VIP addresses.
The range is from 1 through 100.
• Members VIP: Select the VIPs from the Available VIPs list and click Add to add it to the
Selected VIPs list.
NOTE
Click Add All to add all the VIPs entries in the available list to the selected list. Also, you can
delete the VIPs from the selected list, by clicking Remove or Remove All.
• Interface: Select an interface that you want to include in the VIP group.
• Virtual Interface: Enter the number of virtual interfaces. The range is from 1 through 64.
The default value is 1.
NOTE
The device will consider either the interface details or virtual interface details. If you
provide the interface details, then the virtual interface will not be considered.
• Associate VRRP-E VRID: Enter the VRRP-E VRID number that must be associated with the
VIP group. The range is from 1 through 10. The default value is 1.
5. Click Apply to save your entries.
Click Reset to revert the configuration to the previous configured values.