
Technical data


Fabric OS Encryption Administrator’s Guide (DPM) 111
53-1002720-02
Viewing and editing encryption group properties
2
Importing a signed public key certificate from properties
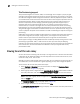
To import a signed public key certificate, complete the following steps.
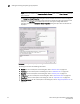
1. Click Import.
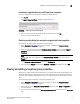
The Import Signed Certificate dialog box displays (Figure 81).
FIGURE 81 Import Signed Certificate dialog box
2. Enter or browse to the file containing the signed certificate, then click OK.
The file is imported onto the switch.
Enabling and disabling the encryption engine state from properties
To enable the encryption engine, complete the following steps:
1. Select Configure > Encryption from the menu task bar to display the Encryption Center
dialog box (Refer to Figure 6 on page 14).
2. Select an encryption engine from the Encryption Center Devices table, then select Engine >
Properties from the menu task bar, or right-click a switch or encryption engine and select
Properties.
NOTE
You can also select a an engine from the Encryption Center Devices table, then click the
Targets icon.
3. In the Encryption Engine Properties table, locate Set State To.
4. Click the adjacent Engine field and select Enabled or Disabled accordingly, then click OK.
Viewing and editing encryption group properties
Whenever you add or change a key vault address, you must also load the corresponding key vault
certificate. When adding or changing a key vault, if the switches in the encryption group have not
been previously registered with the new key vault, you must add the switch certificates to the key
vault.
To view encryption group properties, complete the following steps.
1. Select Configure > Encryption from the menu task bar to display the Encryption Center
dialog box (Refer to Figure 6 on page 14).
2. Select a group from the Encryption Center Devices table, then select Group > Properties from
the menu task bar.
3. You can also select a group from the Encryption Center Devices table, then click the Properties
icon