
Installation, Use and Care Manual


INSTALLATION MANUAL
INSTALLATION
15
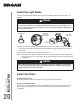
A
C
B
D
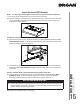
Install the Hood (EZ1 Bracket)
1 ] Run house power cable between service panel and hood location.
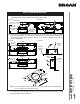
2 ] There are 2 pairs of recessed holes on each side of the top of the hood (on rear: A and B,
on front C and D on illustration below); these holes allow the range hood to hang on the
brackets (previously installed).
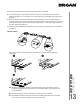
3 ] Temporarily hang the hood on the brackets using its 2 recessed REAR HOLES (A and B).
While holding the hood, run the house power cable into the hood through the strain relief
previously installed in step 6 on page 10.
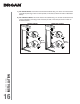
4 ] Unhook the rear holes from the brackets and hang the hood using its 2 recessed FRONT
HOLES (C and D). While holding the hood, attach the power cable to the hood using the
strain relief.
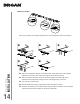
5 ] Hang the hood on the brackets using the 2 recessed FRONT HOLES (C and D). While
holding the hood, run the house power cable into the hood through the strain relief
previously installed in step 6 on page 10. Attach power cable to the hood.
NOTE: See final installation steps on next page.
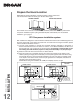
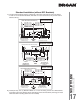
HORIZONTAL EXHAUST INSTALLATION ONLY
VERTICAL EXHAUST INSTALLATION AND NON-DUCTED INSTALLATION ONLY
OTE: N The following procedure applies to both framed or frameless cabinet installations.
DUCTED INSTALLATION ONLY
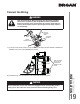
6 ] Connect the ductwork to the hood and use metal foil duct tape to make joints secure and
air-tight. Make sure the damper assembly (or round duct plate) enters the ductwork and
that the damper opens and closes freely.
A
B