
User manual


LinkMAX
HSA300 User Manual
78
Configuring HSA300’s Interfaces with RIP
The following instructions describe how to enable RIP on HSA300.
Note
In order for HSA300 to communicate with other devices using
RIP, you must also enable the other devices to use the protocol.
See the product documentation for those devices.
1. Log into the Configuration Manager, click the Services tab,
and then click
RIP
in the task bar.
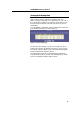
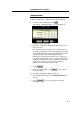
The RIP Configuration page displays, as shown in Figure 39.
Figure 39. RIP Configuration Page
The page contains radio buttons for enabling or disabling the
RIP feature and a table listing interfaces on which the protocol
is currently running. The first time you open this page, the table
may be empty.
2. If necessary, change the Age and Update Time.
These are global settings for all interfaces that use RIP.
! Age is the amount of time in seconds that the device’s RIP
table will retain each route that it learns from adjacent
computers.
! Update Time specifies how frequently HSA300 will send
out its routing table its neighbors.
3. In the IFName column, select the name of the interface on
which you want to enable RIP.
For communication with RIP-enabled devices on your LAN,
select eth-0 or the name of the appropriate virtual Ethernet
interface.
For communication with your ISP or a remote LAN, select the
corresponding ppp, eoa, or other WAN interface.
(See page 43 for a description of various interfaces and their
names.)
4. Select a metric value for the interface.
RIP uses a “hop count” as a way to determine the best path to
a given destination in the network. The hop count is the sum of
the metric values assigned to each port through which data is
passed before reaching the destination. Among several