
User manual


LinkMAX
HSA300 User Manual
40
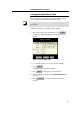
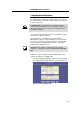
Configuring the USB Port IP Address
1. If the LAN Configuration page is not already displaying,
click the LAN tab.
2. In the USB Configuration table, enter the IP Address and
Network Mask for the USB port.
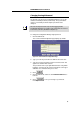
The IP address must place the USB port in the same subnet as
the USB computer; If you are using both the LAN port and the
USB port, however, the USB port and USB computer must not
be in the same subnet as the LAN port or the computers
attached to it.
For example, you could assign the following IP addresses to
the LAN and USB ports (both assume a network mask of
255.255.255.0):
Port IP Address Computer(s) IP
Address(es)
LAN
192.168.0.1 192.168.0.x (x = 3-254)
USB
192.168.0.2 192.168.0.x (x = 3-254)
3. Click
.
!
If you are currently communicating with the device via the
USB interface, then the connection will be terminated,
because the IP address that the connection was using has
now changed.
! If you are currently using the Ethernet interface, a page will
display to confirm your change and your connection will
remain active.
4. If necessary, reconfigure your USB PC so that its IP address
places it in the same subnet as the new IP address of the
USB port. See the Quick Start chapter, “Part 2 —
Configuring Your Computers,” for instructions.
5. Log into Configuration Manager by typing the new USB port
IP address in your Web browser’s address/location box.
6. If the new settings work properly click the Admin tab, and
then click
Commit & Reboot
in the task bar.
7. Click
to save your changes to permanent
memory.