
Specifications


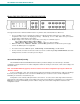


NTI VEEMUX DVI VIDEO MATRIX SWITCH
7
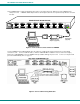
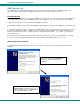
4. To make a remote connection, over the Ethernet, from anywhere on the local area network, connect a CAT5/5e/6 Ethernet
cable with RJ45 male connectors on the ends, wired straight through (pin 1 to pin 1, pin 2 to pin 2, etc.).
Figure 7- Connect VEEMUX to local area network
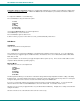
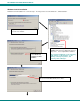
5. Connect the powercord to the VEEMUX and plug it in.
Figure 8- Attach AC power cord to VEEMUX
6. Power ON the components in this order
:
A. Power ON the display devices
B. Power ON the VEEMUX. Wait for the LCD to display connections.
C. Power ON the video sources
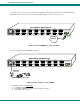
RJ45
"<USB>"
RJ45
"<USB>"
FUSE T2A,250V
AC INPUT 100-240VAC,30W
INPUT 1INPUT 6INPUT 7INPUT 8 INPUT 5
INPUT 2
INPUT 3INPUT 4
RS232
ETHERNET
(DCE)
OUTPUT 1OUTPUT 2OUTPUT 3OUTPUT 4OUTPUT 5OUTPUT 6OUTPUT 7OUTPUT 8
REAR VIEW OF SM-8X8-DVI-LCD
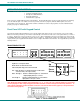
RJ45-male
connector
Ethernet
RJ45
"<USB>"
RJ45
"<USB>"
FUSE T2A,250V
AC INPUT 100-240VAC,30W
INPUT 1INPUT 6INPUT 7INPUT 8 INPUT 5 INPUT 2INPUT 3INPUT 4
RS232
ETHERNET(DCE)
OUTPUT 1OUTPUT 2OUTPUT 3OUTPUT 4OUTPUT 5OUTPUT 6OUTPUT 7OUTPUT 8
REAR VIEW OF SM-8X8-DVI-LCD
IEC female
connector
Power Cable