P2314_R02.
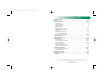
P2314_R02.qxd 6/4/2004 11:12 AM Page 2 Table of Contents Safety Information . . . . . . . . . . . . . . . . . . . . . . . . . . . . . . . . . . . . . . . . . . . 2-5 Features . . . . . . . . . . . . . . . . . . . . . . . . . . . . . . . . . . . . . . . . . . . . . . . . . . 6-7 Using the Restraint . . . . . . . . . . . . . . . . . . . . . . . . . . . . . . . . . . . . . . . . . 8-17 LATCH Storage . . . . . . . . . . . . . . . . . . . . . . . . . . . . . . . . . . . . . . . . . . . . .
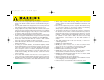
P2314_R02.qxd 6/4/2004 11:12 AM Page 4 • Use only in a rear facing position when using this restraint in the vehicle. This infant restraint cannot be used forward facing in a vehicle. • Use only with children who weigh between 4 and 22 pounds (2 and 10 kg) and whose height is 30 inches (76 cm) or less. • Snugly adjust the belts provided with this restraint around your child. A snug strap should not allow any slack. It lies in a relatively straight line without sagging.
P2314_R02.qxd 6/4/2004 11:12 AM Page 6 Safety Information IMPORTANT NOTES • Verify that the child restraint is secure and that the harness is properly adjusted around the child each time the child restraint is used. • Adjust the harness to fit the clothes the child is wearing. The fit for a child in winter clothes will differ from a child in summer clothes. • Cover the restraint when the vehicle is parked in direct sunlight. Parts of the child restraint could become hot enough to burn the child.
P2314_R02.
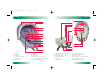
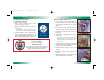
P2314_R02.qxd 6/4/2004 11:12 AM Page 10 Using the Restraint Using the Restraint LATCH Storage Adjustable Handle Removal: Press button on LATCH connector to release from storage ring. Attachment: Attach each LATCH connector to storage ring on front of base, then remove slack A (Fig. A). To adjust, press both handle release buttons (Fig. C) while rotating handle into position.
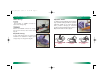
P2314_R02.qxd 6/4/2004 11:13 AM Page 12 Using the Restraint Harness Buckle To Unfasten Buckle (Fig A): • Brace the rear of the buckle with hand. • Use thumb to press release button until tongues are ejected from buckle. To Fasten Buckle (Fig B): • Hold the buckle with one hand. • Use the other hand to insert one tongue A at a time into the buckle. Proper connection is confirmed with a positive click after inserting the second buckle tongue.
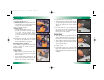
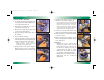
P2314_R02.qxd 6/4/2004 11:13 AM Page 14 Using the Restraint Using the Restraint Adjusting Width of Head Pad Recline Adjustment If your head pad features optional width adjustment, use the following steps to adjust the head pad. To decrease width: Squeeze top center of head pad to inflate sides to desired width (Fig A). A To increase width: Press release valve, indicated with label on head pad, to deflate head pad to desired width.
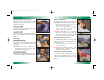
P2314_R02.qxd 6/4/2004 11:13 AM Page 16 Using the Restraint Using the Restraint Checking Harness Height Harness Height Adjustment To Check Harness Height: 1 Place child in restraint, then secure harness (see pages 24–25). 2 Observe where the harness is positioned on the child. 1 Loosen the harness by pressing the harness adjuster lever while pulling the harness straps forward as far as possible (Fig. A). 2 From the rear of the restraint, unhook the harness straps from the yoke (Fig. B).
P2314_R02.qxd 6/4/2004 11:13 AM Page 18 Using the Restraint Using the Restraint Securing Child in Restraint 1 Loosen the harness by pressing the harness adjuster lever while pulling the harness straps forward (Fig. A). 2 Slide the harness strap out of one side of chest clip to release (Fig. B). 3 Unfasten the buckle by pressing down A on the release button (Fig C). 4 Move the harness straps to the sides of the restraint. 5 Place child in the restraint.
P2314_R02.qxd 6/4/2004 11:13 AM Page 20 Vehicle Safety Belts NOTE: The information in this section applies only to installation with vehicle belts. IMPORTANT: Some vehicles have no seating positions which are compatible with this child restraint, or any other child restraint. If in doubt, contact the vehicle manufacturer for assistance. The following types of vehicle belts are not compatible with this child restraint: Front vehicle belts with top or bottom anchorage points in the door.
P2314_R02.qxd 6/4/2004 11:14 AM Page 22 Base Installation Base Installation 8 Adjust recline by turning knob on front of base until correct angle is achieved. LATCH Installation • Figure A illustrates a typical rear facing LATCH installation. • Verify that your vehicle is equipped with LATCH anchors. If LATCH anchors are not installed, you must use vehicle belt installation methods. • When correctly reclined, the red line on base will be level with the ground.
P2314_R02.qxd 6/4/2004 11:14 AM Page 24 Base Installation Base Installation Lap-Shoulder Belt Installation 5 Verify that the vehicle belt is not twisted, then buckle (Fig. D). 6 Adjust recline by turning knob on front of base until correct angle is achieved. • Figure A illustrates a typical rear facing lapshoulder belt installation. • If attached, remove restraint before installing base. • When not in use, always store the LATCH connectors on storage ring at front of base.
P2314_R02.qxd 6/4/2004 11:14 AM Page 26 Base Installation Base Installation Lap Belt Installation 7 Push the base firmly into the seat while removing slack from the vehicle belt (Fig. D). 8 Close lock-off plate over the vehicle belt, then secure by closing both tabs while pressing firmly on the lock-off plate. • Figure A illustrates a typical rear facing lap belt installation with the restraint attached. • If attached, remove restraint before installing base.
P2314_R02.qxd 6/4/2004 11:14 AM Page 28 Installation Without Base Installation Without Base 5 Verify that the vehicle belt is not twisted, then buckle (Fig. D). Lap-Shoulder Belt Installation • Figure A illustrates a typical rear facing lapshoulder belt installation of restraint only. WARNING: Do not install this restraint using a non-locking ELR vehicle belt, unless a locking clip is used. Refer to the vehicle owner's manual for instructions on correct use of vehicle belts with child A restraints.
P2314_R02.qxd 6/4/2004 11:14 AM Page 30 Installation Without Base Lap Belt Installation • Figure A illustrates a typical rear facing lap belt installation of restraint only. WARNING: Do not install this restraint using a non-locking ELR vehicle belt, unless a belt shortening clip is used. Refer to the vehicle owner's manual for instructions on correct use of vehicle belts with child A restraints. 1 Place the restraint rear facing on the vehicle seat. 2 Push cover back to expose belt guides (Fig. B).
P2314_R02.qxd 6/4/2004 11:14 AM Page 32 Care and Maintenance Care and Maintenance Cover & Head Pad Removal: 1 Unhook attachment clips under each handle pivot point. 2 Loosen the harness by pressing the adjuster lever located in the front of the restraint, while pulling the harness straps forward as far as possible. 3 Unhook the harness straps from the yoke on the bottom of restraint. 4 Unbuckle harness and remove the belly pad from the buckle.
P2314_R02.qxd 6/4/2004 11:14 AM Page 34 Care and Maintenance Care and Maintenance Buckle Cleaning the Buckle Removal: 1 With restraint removed from the base, pull cover and foam back so that the buckle slots are visible. 2 Locate metal buckle strap A retainer on the top side of the restraint. 3 Pull retainer up to loosen. 4 Turn the retainer so that the short side will go down through the slot in the restraint shell to the bottom side of the restraint.
P2314_R02.qxd 6/4/2004 11:14 AM Page 36 Warranty Notes This child restraint was manufactured by Britax. Britax Child Safety, Inc. (“Britax”) warrants this product to the original retail purchaser as follows: LIMITED ONE-YEAR WARRANTY This product is warranted against defective materials or workmanship for one year from the date of original purchase. Proof of purchase is required.
P2314_R02.
P2314_R02.