
User guide


16
Surface Installation - First Fix
Surface Mounted Shower Valve
Before Installation
Flush through the pipework to ensure
removal of debris. Turn off the mains
water supply and close any isolating
valves.
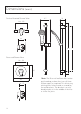
1. Inlet positions
The shower valve has three inlet positions
- top, bottom and rear. Rotate the inlet
elbows as required.
With the elbows screwed fully against
the valve body it can be unscrewed a
maximum of 1.5 turns to allow for lateral
tolerance.
Sufficient 15mm diameter supply pipes
should protrude through the finished
wall surface to fit fully into shower valve
elbows.
2. Attach backplate to wall
Loosen the ‘backplate’ grub screw on the
back of the valve using the hexagonal key.
Use the backplate as a template and mark
the centres of the fixing holes onto the
wall.
Warning: Please check for any hidden
pipes and cables before drilling holes in
the wall.
Drill suitable holes and insert the wall
plugs. Securely attach the backplate to
the wall using countersunk screws (17).
Note: If required, any decorating should
be complete now before starting the
Second Fix (page 17).
Important: Water supplies to the mixer
must be with hot on the left and cold on
the right when viewed from the front.
148 - 152mm
43.5mm
Backplate
fixing holes
Backplate
Hot Cold
17