
User's Manual

MJ192 GB Issue 02
12
12 Cleaning Up
IMPORTANT:
DISCONNECT THE INCUBATOR FROM THE MAINS POWER SUPPLY DURING CLEANING.
ENSURE THAT ALL ELECTRICAL PARTS ARE KEPT DRY.
NEVER WASH THE TRAYS, INSULATED PANELS, FASCIA OR EVAPORATION TRAY PARTS
WITH LIQUIDS OVER 50°C (120°F). DO NOT USE A DISHWASHER TO CLEAN THESE PARTS.
12.1 Following each hatch in the Cabinet Incubator remove and wash the egg tray(s), and most importantly the Hatch
Tray in Incubation Disinfectant Solution. Wipe all other internal surfaces with a soft cloth soaked in the solution.
Ensure that the instructions supplied with the fluid are followed. Dust and fluff may be removed from the fan
guard area with a soft brush.
12.2 If a separate hatcher is used the procedure above should still be followed every two months.
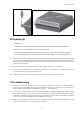
12.3 The exterior of the incubator may be cleaned with a damp cloth. Avoid allowing any moisture to get inside the
top electrical housing or electrical connector at rear.
12.4 Always clean the incubator before storage and ensure that the unit is totally dry inside and out.
13 Troubleshooting
13.1 Poor hatching results are frustrating and can be caused by a large number of factors. The most common are
given below. Brinsea Products will not be held responsible for loss of eggs or chicks under any circumstances. A
wealth of advice and information is available on our website:- www.brinsea.com
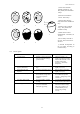
13.2 Gather as much information from the hatching results as possible to enable the problem to be analysed in detail.
Record dates that eggs are set, incubator settings, dates of hatches, weight losses and the number and condition
of hatchlings. Candle or break open unhatched eggs to estimate the extent of embryo development. The Brinsea
Cool-Lume or Egg-Lume candling lamps are available from your dealer.
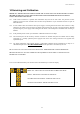
13.3 Many hatching problems are associated with incorrect humidity. Consider upgrading to EX specification to give
better control of humidity. Go to www.brinsea.com for details.