MJ192 GB Issue 02 OVA-EASY 190 and 380 ADVANCE User Instructions Contents Section Subject Page 1 2 3 4 5 6 7 8 9 10 11 12 13 14 15 Introduction Unpacking Location and Installation Quick Reference Digital Control System Storage of eggs Temperature Humidity and Ventilation Egg Turning Egg Setting Hatching Cleaning up Troubleshooting Servicing and Calibration Specifications 2 3 3 3 5 7 7 8 10 11 11 12 12 14 16 1
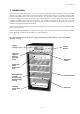
MJ192 GB Issue 02 1 Introduction These instructions detail the operation of your new 190 or 380 egg Digital Cabinet Incubator with programmable automatic egg turning system. Please read these instructions carefully before setting up your machine to achieve best results and keep these instructions safe for future reference.
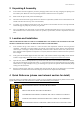
MJ192 GB Issue 02 2 Unpacking & Assembly 2.1 Your incubator has been supplied in protective packaging. Please remove all tape, strapping and packing from the incubator parts. Retain the carton and packing materials to enable the unit to be repacked. 2.2 Please check that parts are all present and undamaged. 2.3 Check also that the electrical supply matches the machine’s requirements (marked on the technical label on the outside of the box and on the top cover of the Incubator). 2.
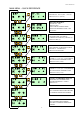
MJ192 GB Issue 02 MAIN MENU – QUICK REFERENCE TEMP OK Å Æ 37.5C OK - + INCUBATION TEMPERATURE. RANGE 20.0 – 40.0°C (68.0 – 104.0°F). DEFAULT 37.5°C (99.5°F). RH% OK Å Æ RH 20% EX ONLY RELATIVE HUMIDITY. RANGE 20% – 80%. DEFAULT 20%. ONLY FOR EX VERSION WITH ADVANCE HUMIDITY PUMP – SEE SECTION 8. TURN 0/1 OK Å Æ TURN 1 OK - + AUTOMATIC TURNING STATUS. SWITCHES THE AUTOMATIC TURNING SYSTEM ON (1) OR OFF (0). DEFAULT OFF (0). TURN INT OK Å Æ MINS 90 OK - + TURNING INTERVAL.
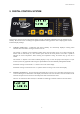
MJ192 GB Issue 02 5 DIGITAL CONTROL SYSTEM T*37.5C H*45% / The Ova-Easy Advance control system utilises highly accurate, individually calibrated sensors for temperature and humidity. Be cautious of low cost analogue or digital thermometers and hygrometers when comparing them with the incubator display readings. 5.1 NORMAL OPERATION – Temperature and relative humidity are continuously displayed. Turning status indicator shows if automatic turning is switched on or off.
MJ192 GB Issue 02 5.3 HIGH TEMPERATURE ALARM DISPLAY – If the measured temperature goes up by more than the figure in the ALARM HI screen, the alarm will sound immediately and “+T” will be displayed. Press OK to silence the alarm for 30 minutes. If the high temperature problem rectifies itself the “+T” remains on the display to show this has happened. Press OK to clear the indicator. Check the incubator is not (and has not been) in direct sunlight or too near a heat source such as a room heater.
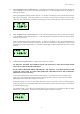
MJ192 GB Issue 02 5.6 TURN SYSTEM FAULT ALARM - If the shelves become jammed by debris or incorrectly loaded trays the motor is switched off and an alarm sounds. The display shows "FAULT". Automatic turning is also temporarily set to off (0) in the Main Menu to prevent the turn restarting. Always check trays are loaded to the back of each shelf as damage may occur if the shelves are jammed by trays placed too far forward. T*37.5C FAULT 5.
MJ192 GB Issue 02 7.6 Recommended temperatures: Hens Pheasant Quail Ducks Geese Typical incubation period: 37.4 – 37.6°C 37.6 – 37.8°C 37.6 – 37.8°C 37.4 – 37.6°C 37.4 – 37.6°C 99.3 – 99.6°F 99.6 - 100°F 99.6 - 100°F 99.3 – 99.6°F 99.3 – 99.6°F 21 days 23-27 days 16-23 days 28 days 28-32 days 7.7 Developing embryos are fairly tolerant of short term temperature drops and the user need not be concerned about cooling that occurs when inspecting eggs.
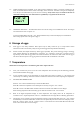
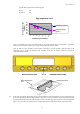
MJ192 GB Issue 02 Typical ideal weight losses for species groups: Poultry Waterfowl 13% 14% 68 66 64 62 60 58 56 54 Ideal weight (grams) 20 17 14 11 8 5 Measured weight (grams) 2 Average egg weight (grams) Egg weight loss chart Incubation period (days) Of the two methods given above the most reliable is egg weight method and is recommended – particularly where poor hatch rates are experienced or if eggs of high value are being incubated.
MJ192 GB Issue 02 8.4 During hatching the high humidity levels will fall dramatically when the door is opened and will take some time to build up. Resist the temptation to open the door frequently – leave for at least 6 hours between inspections. 8.5 The Brinsea Advance Humidity Pump is available as an option on the Ova-Easy Advance incubators.
MJ192 GB Issue 02 9.4 STOPPING A TURN TO LOAD THE SHELVES (OR USE ALL SHELVES FOR HATCHING) Press any button to stop a turn. This is useful to stop the shelves once they are level for loading trays and for when the whole incubator is to be used for hatching eggs. If automatic turning is ON the turn will PAUSE to allow trays to be loaded. Once the trays are loaded and the door is shut press any button to continue the turn.
MJ192 GB Issue 02 12 Cleaning Up IMPORTANT: DISCONNECT THE INCUBATOR FROM THE MAINS POWER SUPPLY DURING CLEANING. ENSURE THAT ALL ELECTRICAL PARTS ARE KEPT DRY. NEVER WASH THE TRAYS, INSULATED PANELS, FASCIA OR EVAPORATION TRAY PARTS WITH LIQUIDS OVER 50°C (120°F). DO NOT USE A DISHWASHER TO CLEAN THESE PARTS. 12.1 Following each hatch in the Cabinet Incubator remove and wash the egg tray(s), and most importantly the Hatch Tray in Incubation Disinfectant Solution.
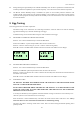
MJ192 GB Issue 02 1) Clear when candled probably infertile (or very early death) when candled at 8 days 2) Fertile with red blood vessels - after 8 days 1 2 3) Red or black staining early death when candled at 8 days 1 10 20 3 4) Embryo with red blood ‘ring’ - early death when candled at 8 days 7 4 5 5) Dark outline with ill defined detail - late death (1016 days) 6) Live embryo with bill in air sack - due to hatch in 2448 hours 6 7) Normal development of the air pocket according to number of d
MJ192 GB Issue 02 14 Servicing and Calibration IMPORTANT: THE HEATER AND CONTROL SYSTEM ARE AT MAINS VOLTAGE. NEVER ATTEMPT ANY KIND OR FORM OF SERVICING UNLESS THE MACHINE IS DISCONNECTED FROM THE MAINS ELECTRICITY SUPPLY. RISK OF ELECTRIC SHOCK! 14.1 Under certain conditions it is possible that condensation may form on the inner walls. The presence of water gathering at the base of the incubator does not affect the performance of your incubator and does not pose an electrical hazard. 14.
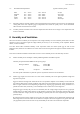
MJ192 GB Issue 02 CALIBRATION MENU CAL TEMP OK Å Æ T 37.3C OK CAL! CALIBRATE THERMOMETER. TAKE READINGS AT 30mm ABOVE THE CENTRE OF EACH EGG TRAY AND CALCULATE THE AVERAGE. CAL RH% OK Å Æ RH 28% OK CAL! CALIBRATE HYGROMETER. PLACE HYGROMETER IN CENTRE WITH NO WATER IN THE EVAPORATING TRAY. RH CYCLE OK Å Æ RHC 7S OK - + HUMIDITY PUMP CYCLE TIME. ONLY APPLICABLE WHEN USED WITH THE BRINSEA ADVANCE HUMIDITY PUMP. AMBIENT OK Å Æ T 20.0C OK - + AMBIENT TEMPERATURE COMPENSATION.
MJ192 GB Issue 02 15 Specification Maximum Approximate Setting Capacities (includes use of hatching trays and special inserts): Egg size Ova-Easy 190 Advance Ova-Easy 380 Advance Quail Pheasant Hen Duck Goose 869 233 192 104 57 1738 466 384 280 114 Dimensions: 190 Advance 820 x 420 x 480mm (32.5” x 16.5” x 19”) HxWxD 380 Advance 820 x 420 x 800mm (32.5” x 16.5” x 31.