
User's Manual


AE21 GB Issue 02
4
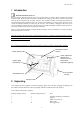
3.5 Connect the mains cable to the incubator lid. Ensure the connector is pushed fully home in its socket; it
may be quite a tight fit.
3.6 Plug the incubator mains supply cable into a suitable outlet ensuring that the cable is not pulled tight. The
incubator fan will start and the red LED in the temperature control housing will light continuously. Allow
the incubator to run for at least an hour to stabilise the temperature before making adjustments or setting
eggs.
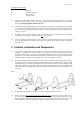
Stable and correct temperature is essential for good results. Adjust with care.
Please note: your incubator may not be set to the correct temperature from the factory and the
following procedure must be followed before setting eggs.
3.7 As the incubator warms up and approaches its control setting the red heater indicator LED will change
from continuously on to flashing. Allow the incubator to stabilise for at least an hour before adjusting the
temperature.
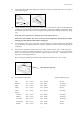
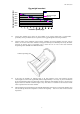
3.8 Rotate the red adjustment spindle located in the cable connector housing with a small screwdriver –
clockwise to increase temperature, anticlockwise to reduce it. 1°C (2°F) is about ¼ turn of the spindle.
Refer to the thermometer to check temperature. Adjust temperature with care – small differences have
large effects on hatching performance.
When reducing temperature the red LED may go out while the incubator cools – this is normal.
3.9 Recommended temperatures: Typical incubation period:
Hens 37.4 – 37.6°C 99.3 – 99.6°F 21 days
Pheasant 37.6 – 37.8°C 99.6 - 100°F 23-27 days
Quail 37.6 – 37.8°C 99.6 - 100°F 16-23 days
Ducks 37.4 – 37.6°C 99.3 – 99.6°F 28 days
Geese 37.4 – 37.6°C 99.3 – 99.6°F 28-32 days
Parrots:
Amazons 36.8 – 37.0°C 98.3 – 98.6ºF 24-29 days
Macaws 36.8 – 37.0°C 98.3 – 98.6ºF 26-28 days
Love birds 36.8 – 37.0°C 98.3 – 98.6ºF 22-24 days
African Grey 36.8 – 37.0°C 98.3 – 98.6ºF 28 days
Eclectus 36.8 – 37.0°C 98.3 – 98.6ºF 28 days
Red Adjustment Spindle
Octagon 40
only