AE21 GB Issue 02 Octagon 20 Eco and Octagon 40 Eco egg incubators User instructions Contents Section 1 2 3 4 5 6 7 8 9 10 11 12 Subject Introduction Unpacking Location, Installation and Temperature Storage of eggs Humidity and Ventilation Egg setting Egg turning Hatching Cleaning up Servicing Troubleshooting Specifications 1 Page 2 2 3 5 5 8 8 8 9 9 10 11
AE21 GB Issue 02 1 Introduction Read the instructions before use. These instructions detail the operation of your new Octagon 20 Eco or Octagon 40 Eco incubator and optional Autoturn Cradle. Please read these instructions carefully before setting up your machine to achieve best results and keep these instructions safe for future reference.
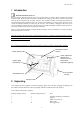
AE21 GB Issue 02 Optional Autoturn Cradle:2 1 1 1 Base bars Motorised cradle end Plain cradle end Set of four bolts 2.1 Please identify each part and check that they are all present and undamaged. If there are any parts damaged or missing please contact your retailer or Brinsea Products (at the address at the end of the document). Damaged appliances shall not be used. 2.
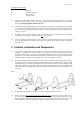
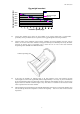
AE21 GB Issue 02 3.5 Connect the mains cable to the incubator lid. Ensure the connector is pushed fully home in its socket; it may be quite a tight fit. Octagon 40 only 3.6 Plug the incubator mains supply cable into a suitable outlet ensuring that the cable is not pulled tight. The incubator fan will start and the red LED in the temperature control housing will light continuously. Allow the incubator to run for at least an hour to stabilise the temperature before making adjustments or setting eggs.
AE21 GB Issue 02 3.10 Developing embryos are fairly tolerant of short term temperature drops and the user need not be concerned about cooling that occurs when inspecting eggs. Temperatures above ideal can quickly have a serious detrimental effect on hatch rates and must be avoided. 3.11 Once the correct temperature has been achieved the cable cover must be fitted to ensure the cable is correctly clamped and the connections are fully protected from splashes of water.
AE21 GB Issue 02 5.2 There are three methods available to bird breeders to achieve correct humidity levels: a) Follow the manufacturer’s guidelines for water and ventilation levels (see below). b) Measure humidity levels and adjust to match published guidelines for different species (see below). c) Monitor egg weight loss which varies as a direct result of humidity and correct against published weight loss figures for the species.
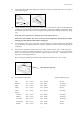
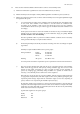
AE21 GB Issue 02 Average egg weight (grams) Egg weight loss chart Ideal weight (grams) 68.0 66.0 64.0 62.0 60.0 58.0 56.0 54.0 Measured weight (grams) Incubation period (days) 5.3 Of the three methods given above the most reliable is egg weight method and is recommended – particularly where poor hatch rates are experienced or if eggs of high value are being incubated. 5.
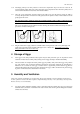
AE21 GB Issue 02 6 Egg Setting 6.1 The Octagon 20 Eco and Octagon 40 Eco are designed to be as flexible as possible, accommodating eggs of different sizes up to (and including) goose eggs and in different orientations. Some experimentation may be necessary to maximise capacity. 6.2 Before setting eggs ensure that the incubator has been run for several hours and has stabilised at the correct temperature. 6.3 Set the eggs in rows between the wire loop dividers.
AE21 GB Issue 02 8.5 When most eggs have hatched (12 to 48 hours) remove the hatchlings to a brooder. The Brinsea EcoGlow is ideal for poultry and waterfowl etc. The Brinsea TLC-40 or TLC-50 Brooder is recommended for exotics. 8.6 During hatching the high humidity levels will fall dramatically when the lid is lifted and will take some time to build up. Resist the temptation to open the incubator frequently – leave for at least 6 hours between inspections.
AE21 GB Issue 02 11 Troubleshooting 11.1 Poor hatching results are frustrating and can be caused by a large number of factors. The most common are given below. Brinsea Products will not be held responsible for loss of eggs or chicks under any circumstances. However we will try to advise on incubation technique to improve results where necessary. 11.2 Gather as much information from the hatching results as possible to enable the problem to be analysed in detail.
AE21 GB Issue 02 12 Specification Maximum Setting Capacities: Octagon 20 Advance Octagon 40 Advance Egg size Typical capacity Typical capacity Quail Pheasant Amazon/Macaw Hen Duck Goose 60 40 36 24 20 9-12 120 80 72 48 40 18-24 Incubator only Including Autoturn Cradle 35cm x 26cm x 26cm high 43cm x 26cm x 30cm high 65cm x 26cm x 26cm high 73cm x 26cm x 30cm high Weight: Incubator only Including Autoturn Cradle 2.70 Kg 3.25 Kg 4.20 Kg 4.
AE21 GB Issue 02 Declaration of Conformity We: BRINSEA PRODUCTS LTD.