
How to Guide


================================================================================================
L-1762-F18
ASSEMBLY: 48” Plug Aerator
(
PA-48 BH
)
17
2
2
18
C
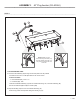
STEP 4
----------------------------------
C. Insert Hitch Pin (17) in Clevis (2) and
secure with Hairpin Cotter (18). Grasp Hitch
Pin and pull forward.
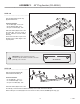
STEP 5
-------------------
Find this
hardware:
- x32 Hex Head Bolts (20) - 5/16 x 0.75”
- x32 Flat Washers (24) - 5/16”
- x32 Lock Nuts (28) - 5/16”
Now insert a Nylon Bearing (15)
into both ends of all the tube
assemblies (12 & 13).
Align Plugging Spoons (9) to each
welded plate (side opposite welds) of
all the Tube Assemblies (12 and 13) as
shown.
Run bolts through the Plugging
Spoons and secure to each tube
assembly (12 and 13) with Lock Nuts
(28) as illustrated here.
15
15
15
15
20
28
24
9
9
9
9
12
&
13
IMPORTANT: Rounded
part of spoon fits against the
tube to lock in place.
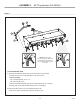
D. Securely tighten all fasteners installed
in Steps 4-A and 4-B. After that, securely
tighten all the hardware installed from
Step 2-B through Step 3.