SET UP / OPERATION GUIDE model no. BEC-110 : E T ess.com. r O p x N E w T e r N IMPORTA eo online at www.B ization. t author tional vid c u u o r h t s it in w r e u s a o ce of purch mation see r la o p f o .268.
CON T EN TS 1. Safety 1-2 2. Specifications & Requirements 3 3. Hardware/Tools/Parts 4 4. Set Up 4 -6 5. Features 7 6. Control Functions 8 7. Start Up 9 8. Operation 9. Maintenance 10. Troubleshooting 11. Parts & Service 12.
SAFETY IMPORTANT SAFEGUARDS When using electrical appliances, basic safety precautions should always be followed, including the following: 1. Read all Instructions. 2. Do not touch hot surfaces. Use handles or knobs. 3. The voltage and frequency of the supply connections should conform to those of the rating label. 4. Close supervision is necessary when any appliance is used by or near children. 5. Allow to cool before putting on or taking off parts, and before cleaning the appliance. 6.
SAFETY IMPORTANT: Please read and follow instructions carefully before starting your BREW EXPRESS COFFEE SYSTEM. The BREW EXPRESS dispenses extremely hot water. Hot liquids may cause severe burns if it contacts skin. Use extreme caution when handling hot liquids dispensed by the BREW EXPRESS. KEEP HANDS AWAY FROM SPRAY HEAD, BREW BASKET, CARAFE OR MUG DURING BREW CYCLE. • DO NOT use carafe or mug that is cracked or damaged. • DO NOT remove the brew basket while brewer is in operation.
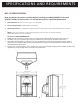
SPECIFICATIONS AND REQUIREMENTS BEC-110 SPECIFICATIONS: Read and follow instructions carefully before installing your BREW EXPRESS in-the-wall COFFEE SYSTEM. For best results, it is advised that you hire a qualified professional. 1. Overall Dimensions 12 1/4” X 13 1/2” X 7 3/4” (see below). 2. Electrical Requirements 120VAC, 60HZ. (1400 watts). 3. Water Requirements 1/4” OD water supply line (copper or poly) 30 psi to 90 psi. Potable COLD water is required.
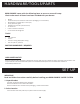
HARDWARE/TOOLS/PARTS BREW EXPRESS comes with the following items to ensure a successful setup. Check to be certain all items have been included with your brewer.
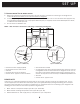
SET UP 3. Connect water line to water source. A. B. C. Water source options are typically the cold water tap under the sink or the water line connecting to the refrigerator ice maker. DO NOT connect directly to ice maker line located on refrigerator. If connecting to refrigerator supply Brew Express provides a ¼” T to connect to the ¼” line. Sometimes this supply line may be a compression braided line. If so, it may require additional parts (not supplied).
SET UP 4. Run water line to brewer location. A. Run water line behind cabinets through the wall to brewer area. B. Run water line direct from source to counter top (for example along the side of the refrigerator). ! ! water filter recomended Water filter recommended (not (not included) included) 5. Waterline connection to brewer A. Cut waterline near final location of brewer. B. Attached water line to quick connector (supplied).
FEATURES Convenient and practical. Brew Express™ is plumbed into the wall and fills on command so you never have to manually fill with water. Handsome Euro design compliments any decor. Power Switch Patented in-the-wall design saves precious counter space. Unique brew basket allows for removal of carafe without spilling. The blue accent light is an attractive addition to any room and helpful nightlight. Stylish and sturdy construction designed for years of use and trouble-free maintenance.
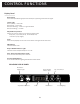
CONTROL FUNCTIONS Display Panel Brew Button Starts brew cycle. Brewing stops automatically or by pressing the brew button again.
START UP IMPORTANT: Please read and follow instructions carefully before starting your BREW EXPRESS COFFEE SYSTEM. Did you purge water lines during installation to remove any foreign particles (debris) in lines? Debris in water lines can clog brewer system causing failure, and VOID ALL WARRANTIES. The BREW EXPRESS dispenses extremely hot water. Hot liquids may cause severe burns if it contacts skin. Use extreme caution when handling hot liquids dispensed by the BREW EXPRESS.
OPERATION 1. Power Switch Switch located on top of brewer. Depress button to turn on power 2. Set Clock The clock is preset to 12:00 noon when power is first applied. To set the time, follow these steps: a. Press and hold the “light” button for 5 seconds, or wait for clock to flash. b. Press “Brew” button to toggle between 12 and 24 hour clock. AM/PM light is off for 24 hour clock. c. Press the “Cup Selector” button to set hours. Note AM/PM indicator light. Holding down button advances hours. d.
OPERATION 7. Manual Brew Cycle T o manually start a brew cycle press the “Brew” button. The brew light will turn red once the cycle has started. If brewer is cold, the heater will preheat the water before starting the brew cycle. After the selected amount of water is dispensed, the brew light will blink for 40 seconds. At that time the BREW EXPRESS will beep 4 times. 8. Automatic Brew Cycle To automatically start a brew cycle press the “Timer” button every time.
MAINTENANCE Cleaning Carafe Clean the carafe and lid after each use with warm water and a mild dish soap. Brew Basket The brew basket should also be cleaned after each use with mild dish soap and warm water. The brew basket is dishwasher safe (top rack only). Spray Head It is recommended the spray head be cleaned occasionally with mild soap and warm water depending on the amount of use. When the unit is cool, remove the spray head by gently rotating it by hand counter clockwise.
TROUBLESHOOTING No power or display is not illuminated • • • Press power button (on top of brewer). Confirm the power to unit is “on”. Make sure power is “on” at the outlet Check by using another outlet. If power switch is not working and power is available call for service, send email to info@brewexpressdirect.com, or submit for repair at www.brewexpressdirect.com then select service options – RRA.
TROUBLESHOOTING Excessive Steam • • • Remove spray-head and check for calcium blockage. Unit may be plugging up from debris or calcium IF newer unit, check the temperature program bypass switch located on rear of machine by the cord storage. If “OFF” then turn to “ON” position. This will cool unit down slightly. Call or email for service. bypass switch Taste Not Acceptable • • • • Quality or quantity of coffee placed in brew basket is not sufficient (purchase better quality coffee).
PARTS & SERVICE Water dripping from spray head • • Normally some water will drip from the spray head shortly after brewing. Debris may be inside valve. Disconnect water and reconnect, then run 1-2 full cycles of water in carafe. If problem persists, contact customer service. Programmed start time not working properly • Review instructions on page 6 (Automatic Brew Cycle). Spare parts are available from Brew Express (866) 268-5953 or at Info@BrewExpressDirect.com.
WARRANTY 1 YEAR LIMITED WARRANTY This limited warranty is the only one that applies to this product, and sets forth all the responsibilities of Brew Express regarding this product. There is no other warranty, other than that described herein. BREW EXPRESS is warranted, to the original purchaser only, to be free of defects for parts and labor for a period of 1 year from the date of purchase. This warranty does not extend to subsequent purchasers, or purchases through a non-authorized dealer or auction site.
WARRANTY Warra n ty R e g istration Ca rd Register for warranty Fill out the form below, cut out and send to: Brew Express PO Box 1726 Longview, WA 98632 Please Register 30 days after purchase. Retain receipt for proof of purchase.
www.brewexpressdirect.com for customer service or technical service please call (866)-268-5953 Printed in CHINA.