
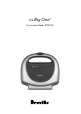
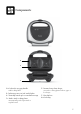
Instruction Manual


7
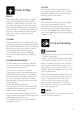
Hints & Tips
BREAD
The toastie maker is designed for use with
supersized and regular-sized bread. With
extra large cooking plates, it seals and cooks
the toastie. Most types of bread can be used;
white, wholemeal, kibbled wheat, wholegrain,
raisin loaf and so on. When using raisin bread,
brioche or other sweet breads which contain
high sugar content, remember they will
brown faster.
FILLINGS
Try to use canned or pre-cooked fruit as fresh
fruit may give off excessive juices when heated.
Be careful when biting into toasties containing
fillings such as cheese and tomato or jam as
they retain heat and can burn if eaten
too quickly. One quarter cup of filling for
each toastie is sufficient. Do not overfill your
toasties.
BUTTER OR MARGARINE
For best results we recommend to butter the
outside of the bread i.e. place filling between
the unbuttered sides of bread.
If you are on a low fat diet or kilojoule
counting, the outside of the bread may be left
unbuttered. Season the plates occasionally to
prevent sticking and to make cleaning easier.
To season, brush the cooking plates with a
little vegetable oil and rub off the excess with
absorbent paper.
Do this after preheating the unit.
Do not use spray or non-stick coatings as this
will affect the performance of the non-stick
surface on the cooking plates.
For sweet snacks, a light sprinkling of caster
sugar over the outer buttered sides of the bread
will make them extra delicious.
For extra flavour use herb or garlic butter for
spreading on bread.
PASTRY
Thawed ready-rolled pastry is the easiest to
use, either in sheets or from a roll. See page 12
for further details. Please note, frozen pastry
will snap in the toastie maker.
REHEATING
If the toastie is not being eaten immediately,
place it on a paper napkin to absorb
condensation. To keep for longer, place on a
rack in an oven-proof dish to keep warm in a
low oven, about 100°C. The toastie will keep
hot for up to 20 minutes this way, but will then
begin to dry out.
Care & Cleaning
IMPORTANT
• Do not immerse any part of the toastie maker
in water or any liquid.
• Always switch off and unplug toastie maker
from power outlet when not in use or storing.
Before cleaning, turn the power off at the
power outlet and then remove the power
plug. Allow your the toastie maker to cool
slightly. The toastie maker is easier to clean
when slightly warm.
Always clean your toastie maker after each
use to prevent a build up of baked-on foods.
Wipe cooking plates with a soft cloth. If
cooked on food is not removed by this
method, brush with a little oil or melted
butter. Allow to stand for five minutes then
wipe with a damp cloth.
NOTE
The cooking plates are coated with a non-stick
surface, do not use abrasives.