
Instruction Manual


6
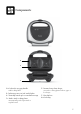
Functions
BEFORE FIRST USE
Check that cooking plates are clean and free of
dust. If necessary, wipe over with a damp cloth.
Place the toastie maker on a flat, level surface
with the lid in the closed position.
1. Insert power plug into a 230/240V power
outlet and turn the power on. The orange
power ‘ON’ light will illuminate.
2. Allow the toastie maker to preheat until the
green ‘READY’ light illuminates.
3. During this time, prepare the toastie by
buttering four slices of bread and
preparing filling.
4. Place two slices of bread on the plates,
buttered sides down. Place filling on top
of bread.
5. Place remaining bread on filling, buttered
side up.
NOTE
The green ‘READY’ light will cycle on and off
during the toasting process indicating that the
correct temperature is being maintained.
6. Carefully close the lid and clip handles
together. Do not force the lid to close.
7. Toasting should take approximately three
minutes. Exact toasting time will be a
matter of taste. It will also depend on the
type of bread and type of filling used.
8. When the toastie is cooked, remove it with
the help of a plastic or wooden spatula.
Never use metal tongs or a knife as these
can cause damage to the non-stick coating.
9. To maintain heat, keep the lid closed until
you are ready to toast the next toastie.
NOTE
At all times the lid must be closed. When using
the toastie maker for the first time you may
notice a fine smoke haze. This is caused by the
heating of some of the components. There is
no need for concern.
WARNING
Steam will be ejected from between the
cooking plates when the lid is closed. Be
careful not to make contact with the steam as it
may cause burns.
Fully unwind power cord from cord storage
facility before use.