the Fast Slow GO™ Instruction Book - BPR680
Contents 2 Breville Recommends Safety First 7 Components 8 Control Panel 9 Food Presets 10 Cooking Presets 11 Functions 20 Care & Cleaning 22 Troubleshooting BREVILLE RECOMMENDS SAFETY FIRST At Breville® we are very safety conscious. We design and manufacture consumer products with the safety of you, our valued customer, foremost in mind. In addition, we ask that you exercise a degree of care when using any electrical appliance and adhere to the following precautions.
WARNING Only use the cooking bowl intended for this appliance; using cooking vessels not provided will result in a non-resettable issue. • Do not touch hot surfaces. Appliance surfaces are hot during and after operation. To prevent burns or personal injury, always use protective hot pads or insulated oven mitts, or use handles or knobs where available. • Do not place the appliance near the edge of a bench or table during operation.
• Do not use a damaged removable cooking bowl. Replace before using. • Do not place food or liquid directly into the base. Only the removable cooking bowl is designed to contain food or liquid. • Never operate the cooker without food and liquid in the removable cooking bowl. Ensure a combined minimum of 4 cups (1 litre) of food and/ or liquid when cooking. Using less than 4 cups can result in a reduction of pressurisation.
• Use only recommended STEAM RELEASE button to depressurise cooker after use. • Do not use this appliance for deep frying. • Do not sauté or shallow fry under pressure. • Do not attempt to operate the appliance by any method other than those described in this booklet. Do not leave the appliance unattended when in use. IMPORTANT SAFEGUARDS FOR ALL ELECTRICAL APPLIANCES • Unwind the power cord fully before use.
• The use of attachments not sold or recommended by Breville may cause fire, electric shock or injury. • This appliance is for household use only. Do not use this appliance for other than its intended use. Do not use in moving vehicles or boats. Do not use outdoors. Misuse may cause injury. • The appliance is not intended to be operated by means of an external timer or separate remote control system.
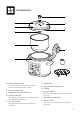
Components A B D C E F G H I J K A. Pressure Release Valve Automatically controls the rate at which steam is released from the cooker B. Pressure Safety Valve C. Dishwasher Safe Removable Lid D. Safety Locking Pin Pin pops up once pressure is reached acting as a safety locking device E. Silicone Lid Seal Easy fitting for hassle free assembly and cleaning F. G. H. I. Sealing Nut 6L Removable Cooking Bowl Lid Arm Easy Clean Moat Catches condensation drips for a mess-free clean up. J.
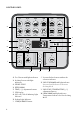
CONTROL PANEL SOUP STOCK MEAT STEW STEAM SAUTÉ | SEAR A B LEGUMES RICE | GRAINS RISOTTO YOGHURT REDUCE SOUS VIDE F C DELAY START D KEEP WARM G H E NATURAL PRESSURE COOK HI HI LO LO SLOW COOK AUTO QUICK PULSE J RELEASE K A. Food Presets with light indicators B. Cooking Presets with light indicators C. DELAY START D. KEEP WARM E. TIME (+ / -) adjustment buttons F. LED display G. Lid Lock / Unlock Warning Light Indicator H. Preheat Light Indicator I.
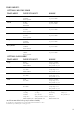
FOOD PRESETS SETTING: PRESSURE COOK FOOD MENU DEFAULT PRESET RANGE Soup 50 kPa 30 MINS AUTO QUICK 10 kPA – 80 kPa Up to 2:00 HRS Stock 80 kPa 1:00 HR NATURAL 10 kPA – 80 kPa Up to 2:00 HRS Meat 80 kPa 1:00 HR AUTO QUICK 10 kPA – 80 kPa Up to 2:00 HRS Stew 60 kPa 1:00 HR AUTO QUICK 10 kPA – 80 kPa Up to 2:00 HRS Legumes 80 kPa 30 MINS NATURAL 10 kPA – 80 kPa Up to 2:00 HRS Rice | Grains 50 kPa 10 MINS AUTO PULSE 10 kPA – 80 kPa Up to 2:00 HRS Risotto 40 kPa 7 MINS AUTO QUICK 10 kPA – 8
COOKING PRESETS SETTING TIME / TEMP PRESET RANGE SAUTE / SEAR COUNT UP TIME Temp: Sear – Med - Low Time: n/a Keep warm: off only REDUCE HIGH 10 MINS Temp: Low - 105°C Med - 115°C High - 130°C Time: 1 MIN – 2 HRS Keep warm: on / off STEAM 15 MIN Temp: 100°C Time: 1 MIN – 1 HR Temp: n/a Keep warm: off only SOUS VIDE 57°C 1:00 HR Temp: 57°C Time: 1 MIN – 24 HRS Temp: 30°C - 90°C Keep warm: n / a KEEP WARM 2:00 HRS COUNT UP TIME Temp: 70°C 10
Functions Pressure Release Valve Cover towards rear of cooker BEFORE FIRST USE 1. Remove and safety discard any packaging material, promotional labels and tape from the cooker. 2. Open the lid by turning the lid knob counter clockwise and lifting lid up and off the appliance until it is in the hinged open position. Unscrew and remove the sealing nut from the centre of the lid and pull the lid away to remove from the lid arm. 3.
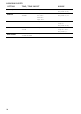
Longer cooking times are needed at higher altitudes to achieve the best food results. For these high altitude areas, it is recommended to use the greater cooking time. Food Menu Pressure Slow Cook Cook Soup ✔ ✔ Stock ✔ ✔ Meat ✔ ✔ Only use the cooking bowl intended for this appliance; using vessels not provided will result in a non-resettable issue.
• Refer to ‘Food Presets’ and ‘Cooking Presets’ section for preset settings recommendations. • If there is no visible light on any of the food preset indicators, then the product is in manual mode. Press a food preset button to return to its default settings. • The steam or pressure release mode programmed into the preset cooking modes are selected for best results. Any changes to the steam release mode may lead to food spillage. 6. Close the lid and turn the lid knob clockwise to lock into place.
release valve. The steam release setting can be changed during the steam release cycle by pressing the STEAM RELEASE button. 14. At the end of the steam release cycle, the cooker alert will sound, the display will flash, and if ‘KEEP WARM’ is on, display timer will start counting up. 15. Open the lid by turning the lid knob counter clockwise and carefully lift the lid into the hinged open position. 16. After 5 minutes of inactivity, standby mode will be activated. The LED will no longer illuminate.
1. Select the Slow Cook on the interface. 2. The LED screen indicates the preset temperature for the selected food. But you may press the PRESSURE/ TEMPERATURE (+/-) buttons to reduce the temperature or to increase temperature. Temperature can be adjusted to three preset temperatures: HI–LO. 3. The LED screen indicates the preset cooking time for the selected food. You may adjust the TIME (+/ -) to reduce or increase the cooking time. Time can be adjusted between 2 and 12 hours. 4.
• Vegetables such as onions, carrots and celery should be cut into large pieces. This will help keep the stock clear and make it easier to strain at the end of cooking. • To shorten the pressurizing time, add cold water to bowl while still in the SAUTÉ/SEAR setting and allow the water to come to a simmer before pressure cooking. • Do not overfill the cooking bowl. The total volume of water, bones and/or aromatics should not exceed the ‘MAX’ level marking inside the removable cooking bowl.
The total volume of uncooked rice and liquid should not exceed the ‘½’ level marking inside the removable cooking bowl. Rice Measurements: White Rice Water Servings 2 cups 2.5 cups 4-6 3 cups 3.75 cups 6-8 4 cups 5 cups 8-12 Brown Rice Water Servings 2 cups 3 cups 4-6 3 cups 4.5 cups 6-8 4 cups 6 cups 8-12 Risotto • The PRESSURE COOK RISOTTO setting is ideal for making creamy risotto, without all the stirring and in a fraction of the time.
What do you need to cook food with the Sous Vide function? Thick heat-proof food safe plastic bags. Resealable bags will also work if the cooking temperature is under 70°C. Do I need to vacuum seal? You do not need to vacuum seal bags for SOUS VIDE, however, as much air as possible needs to be removed from the bag, and water prevented from entering the bag to provide accurate food results.
TIP Cooling the milk with the lid open will result in a skin forming on top. Removing this skin before adding the starter will help to ensure a smoother texture to the yoghurt. STEP 3 – Incubate the Yoghurt At the end of STEP 2, the word ‘ADD’ will appear on the cooker screen. Place the yoghurt starter in a bowl. Add ½ cup of the cooled milk and whisk until smooth. Whisk the milk mixture into the cooled milk in the cooking bowl.
• Time will start counting down and preheat LED will not be illuminated during DELAY START. Care & Cleaning ALTITUDE ADJUST Pressure builds and increases when the temperature inside the cooking bowl exceeds boiling point. As altitude increases, the temperature at which water boils decreases as a result of the drop in air pressure. This creates very different conditions for cooking when using a pressure cooker.
DISASSEMBLE LID: SILICONE RUBBER GASKET: • Gently pull the silicone rubber gasket out from under the gasket holder. Check periodically that it is clean, flexible and not cracked or torn. If damaged do not use the appliance. • Wash the inside of the lid with a wet, soapy sponge or cloth. Use a brush to remove oil residue if necessary. Wipe dry with a clean, damp cloth. • Regularly inspect that Pressure Release Valve Cover is clean and free of liquid/food.
Troubleshooting PROBLEM EASY SOLUTION The lid cannot be opened at the end of the cooking cycle • Press the STEAM RELEASE button until all internal pressure is released, and the cooker can be opened. • If this occurs frequently, the cooker may need to be adjusted to suit your current altitude. Follow “Altitude Adjust” instructions on page 20. • NOTE: The safety locking pin will drop when the lid can be opened.
Notes 23
Breville Customer Service Centre Australian Customers New Zealand Customers Phone: 1300 139 798 Phone: 0800 273 845 Web: Web: www.breville.com www.breville.com Breville, the Breville logo, Master Every Moment, and Fast Slow GO are trademarks of Breville Pty. Ltd. A.B.N. 98 000 092 928. Copyright Breville Pty. Ltd. 2021. Due to continued product improvement, the products illustrated/photographed in this brochure may vary slightly from the actual product.