the 3X Bluicer Pro™ Instruction Book - BJB815
Contents 2 Breville Recommends Safety First 6 Components 7 Assembly 10 Functions 12 Care & Cleaning 14 Troubleshooting BREVILLE RECOMMENDS SAFETY FIRST At Breville we are very safety conscious. We design and manufacture consumer products with the safety of you, our valued customer, foremost in mind. In addition we ask that you exercise a degree of care when using any electrical appliance and adhere to the following precautions.
operating current not more than 30mA are recommended. Consult an electrician for professional advice. • Remove and discard any packaging materials safely, before first use. • To eliminate a choking hazard for young children, discard the protective cover fitted to the power plug safely. • Always ensure the appliance is properly assembled, as per instructions, before use.
instruction booklet should be performed at an authorised Breville® Service Centre. • This appliance is not intended for use by children or by persons with reduced physical, sensory, or mental capabilities, or lack of experience and knowledge. Close supervision is necessary when any appliance is used near children. Children should be supervised to ensure that they do not play with the appliance. • Children should not play with the appliance. • Cleaning of the appliance should not be carried out by children.
emptying and cleaning the blender jug.Remove rind from all citrus fruit before juicing. • Do not use the appliance if the rotating sieve (filter basket) or lid is damaged. • Always make sure chute cover is clamped securely in place before motor is turned on. • Do not operate without the pulp container in place. • Do not unfasten interlock arm while unit is in operation.
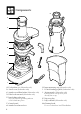
Components H A I B C D J E F K L G A. B. C. D. E. M Food pusher (not dishwasher safe) Juicer cover (dishwasher safe) Stainless steel filter basket (dishwasher safe) Filter bowl surround (dishwasher safe) Interlocking safety arm Stops motor base operating without cover locked into place. F. Control panel G. Stainless steel motor base 6 H. Inner measuring cup (dishwasher safe) I. 1.5 litre blending jug & lid (dishwasher safe) J.
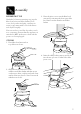
Assembly BEFORE FIRST USE Wash the lid, inner measuring cup, jug, the filter bowl surround, filter basket, juicer cover, food pusher and pulp container in warm, soapy water with a soft cloth. Rinse and dry thoroughly. Place motor base on a flat, dry surface such as a countertop. Ensure that the appliance is switched to OFF at the motor base and the power cord is unplugged. 3.
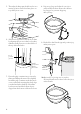
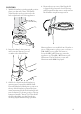
5. The safety locking arm should now be in a vertical position and locked into place on top of the juicer cover. 6. Slide the food pusher down the food chute by aligning the groove in the food pusher, with the small protrusion on the inside of the top of the feed tube. 8. Drip stop plug can be fitted over juice outlet nozzle. It then allows the outlet to be plugged to prevent dripping after juicing. 9. Fit the lid to the blender jug and position jug under juice spout.
BLENDING 1. With the blender jug in the upright position place it on the motor base. The handle of the blender can be positioned to the left or right-hand side of the appliance. 2. Raise the safety locking arm up and locate into the two grooves on either side of the blender. 4. Ensure the spout cover of the blender lid is clipped into place and closed. The ring pull design allows the user to easily remove the lid with a simple leverage action.
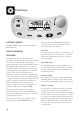
Functions GETTING STARTED The ON / OFF button powers the unit into READY mode. PRESET PROGRAMS BLENDING The appliance has 5 preset functions: Smoothie, Green Smoothie, Pulse/Ice Crush, Auto Clean and Frozen Cocktail. These pre-programmed cycles automatically adjust the blending time and speeds to optimise blending results. These programs are only activated when your appliance is in blender set up. They can't be used when your appliance is set up in juicing configuration.
The maximum amount of ice cubes the blender can blend without liquid in the jug at any one time is 1 standard ice tray or 250g. Auto Clean Use to remove most of the ingredients off the blender walls and blades. Add 2 cups warm soapy water and press the clean button. For harder to clean, sticky or thick ingredients, add ½ teaspoon of dishwashing detergent for extra cleaning power. For best results, clean the blender jug this way immediately after use. The Auto Clean function only cleans the blender jug.
SPEED SELECTOR GUIDE Care & Cleaning FOOD TYPE SPEED APPLES 10 BABY SPINACH 9 BEETROOT 10 BLUEBERRIES 5 BROCCOLI 7 CABBAGE 9 CAPSICUM 9 CARROT 10 CELERY 4 CITRUS FRUITS (peeled) 1 CUCUMBER 4 GINGER 8 GRAPES (seedless) 2 HONEYDEW MELON (peeled) 3 KALE 9 To minimize cleaning, you can line the pulp container with a biodegradable bag to collect the pulp. KIWI (peeled) 5 MOTOR BASE MANGO (peeled, pit removed) 5 Wipe down with a soft damp cloth.
JUG AND LID STUBBORN FOOD STAINS In order to keep your jug clean and avoid food drying on the blades and jug, follow the below steps as soon as possible after use. Rinse most of the ingredients off the jug and lid. Fill the jug with 500ml of warm water, fit the lid and press the AUTO CLEAN button. If thick or sticky ingredients require extra cleaning power add a few drops of dish liquid detergent. Rinse the jug and lid again and/or wash separately in warm soapy water with a soft cloth or bottle brush.
Troubleshooting LCD screen turns on but appliance doesn't respond to controls. Food is unevenly chopped Food is chopped too fine or is watery Excess pulp building up in the stainlesssteel filter basket Pulp too wet and reduced extracted juice • • • • • • • • Juice leaks between the filter bowl surround and the juicer cover Juice sprays out from spout Juice in filter bowl is left after juicer stopped 14 • • • • The safety locking arm may not be correctly engaged in the vertical operating position.
Motor appears to stall during juicing • • • All control panel lights flash and Overload Protection displayed on LCD screen • • • • • Wet pulp can build up under the juicer cover and stall the appliance if the appliance is used excessively without cleaning. If this occurs, disassemble and follow the cleaning instructions to clean the filter bowl surround, the stainlesssteel filter basket and the juicer cover. The appliance can also stall if excessive force is used to push produce down the feed chute.
Breville Customer Service Centre Australian Customers New Zealand Customers Phone: 1300 139 798 Phone: 0800 273 845 Web: Web: www.breville.com.au www.breville.co.nz Breville, the Breville logo and the Twin Turbo Pro are registered trademarks of Breville Pty. Ltd. A.B.N. 98 000 092 928. Copyright Breville Pty. Ltd. 2019. Due to continued product improvement, the products illustrated/photographed in this brochure may vary slightly from the actual product.