Breville Consumer Service Center Canada USA Mail: Breville USA 19400 S. Western Ave Torrance CA 90501-1119 Mail: Breville Canada 2555, Avenue de l’Aviation Pointe-Claire (Montreal) Quebec H9P 2Z2 Phone: 1-866-273-8455 1-866-BREVILLE Phone: 1-855-683-3535 Email: askus@brevilleusa.com Email: askus@breville.ca www.breville.com Breville is a registered trademark of Breville Pty. Ltd. A.B.N. 98 000 092 928. Copyright Breville Pty. Ltd. 2013.
the Smart Grill™ Instruction Booklet - Livret d’instructions BGR820XL/A
CONGRATULATIONS on the purchase of your Breville product Register online for product support and exclusive offers.* USA Consumers: www.brevilleusa.com Canadian Consumers: www.breville.ca *Registering is not a substitute for proof of purchase when submitting a Warranty Claim.
Contents 4 Breville recommends safety first 6 Know your Breville product 9 Assembling your Breville product 11 Operating your Breville product 20 Grilling tips 24 Care & cleaning 28 Recipes 38 French 3
Breville recommends safety first At Breville we are very safety conscious. We design and manufacture consumer products with the safety of you, our valued customer, foremost in mind. In addition we ask that you exercise a degree of care when using any electrical appliance and adhere to the following precautions. Important safeguards Read all instructions BEFORE USE AND SAVE FOR FUTURE REFERENCE • Carefully read all instructions before operating the grill for the first time and save for future reference.
Breville recommends safety first IMPORTANT SAFEGUARDS FOR ALL ELECTRICAL APPLIANCES • • • • • • • • • Fully unwind the power cord before use. Do not let the power cord hang over the edge of a bench or table, touch hot surfaces or become knotted. To protect against electric shock do not immerse the power cord, power plug or appliance in water or any other liquid.
KNOW your Breville product
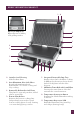
KNOW your Breville PRODUCT P O A Open Flat BBQ Mode Opens flat into a 260 sq. inch grilling surface. N M L B K C D J E F A. Stainless Steel Housing With Die-Cast Arms B. Cast Aluminium, Non-Stick Plates Coated with titanium infused Quantanium™ for oil-free cooking and easy cooking. C. Removable, Dishwasher Safe Plates Flat plate for eggs and pancakes, ribbed plate to sear meats. D. Bottom Plate Release Removes the bottom cooking plate.
KNOW your Breville PRODUCT I. J. K. L. M. N. O. P. Temperature Dial (320°F–450°F) With Low, Panini (sandwich) and Sear modes. Cord Storage Located on the underside of the grill. Adjustable Plate Tilt Adjusts the angle of the bottom cooking plate to drain fats, or can be made flat for eggs and pancakes. Locking Storage Clip Locks the plates closed for upright storage.
ASSEMBLING your Breville product
PAge header..... Assembling your Breville PRODUCT BEFORE FIRST USE NOTE 1. Remove and safely discard any packing material and promotional labels from the grill If the cooking plates are incorrectly inserted, the LCD screen will display INSERT PLATE. Use the 2 x PLATE RELEASE to remove the plates then re-insert so they securely lock into position. Always ensure the grill is completely cool before releasing and removing the cooking plates. 2. Wipe the cooking plates and drip tray with a soft damp sponge.
OPERATING your Breville product
PAge header..... Operating your Breville PRODUCT USE IN OPEN FLAT BBQ MODE The grill opens flat into a 260 sq. inch grilling surface. The ribbed cooking plate is perfect for searing meats while the flat cooking plate is ideal for eggs, pancakes and vegetables. 1. Ensure the drip tray is correctly inserted into the grill. 2. Ensure the cooking plates are correctly inserted and securely locked into position. NOTE If the cooking plates are incorrectly inserted, the LCD screen will display INSERT PLATE.
PAge header..... Operating your Breville PRODUCT NOTE The grill features a temperature conversion button on the left side of the LCD screen. The temperature reading on the grill is preset to Fahrenheit. Pressing the temperature conversion button converts the Fahrenheit temperature reading into Celsius. The corresponding °F or °C symbol will be displayed on the LCD screen. 8. Once the grill has preheated to the selected temperature, the grill alert will sound and HEATING will no longer illuminate.
Operating your Breville PRODUCT c) With your left hand, grip the handle. With your right hand, pull the adjustable height control clip towards you, into the BBQ mode position. Continue to pull the clip forward and simultaneously lift the handle to open, then gently lower the top plate into the horizontal BBQ mode position. NOTE Do not use spray-on, non-stick coatings as these will affect the performance of the non-stick cooking plates. NOTE The LCD screen may display HEATING during the cooking process.
Operating your Breville PRODUCT NOTE NOTE The count-down timer can be stopped or paused at any time by pressing the button within the Timer Dial a second time. The LCD screen will no longer display the count-down indicator. However, the grill will not turn off, it will remain heating. To reset or clear the timer either: - Rotate the timer dial clockwise to increase the time, or counterclockwise to reduce the time.
Operating your Breville PRODUCT Use as a contact grill or panini press 1. Ensure the drip tray is correctly inserted into the grill. 2. Ensure the cooking plates are correctly inserted and securely locked into position. NOTE If the cooking plates are incorrectly inserted, the LCD screen will display INSERT PLATE. Use the 2 x PLATE RELEASE to remove the plates then re-insert so they securely lock into position. Always ensure the grill is completely cool before releasing and removing the cooking plates.
Operating your Breville PRODUCT NOTE NOTE The grill features a temperature conversion button on the left side of the LCD screen. The temperature reading on the grill is preset to Fahrenheit. Pressing the Temperature Conversion Button converts the Fahrenheit temperature reading into Celsius. The corresponding °F or °C symbol will be displayed on the LCD screen.
Operating your Breville PRODUCT NOTE NOTE For best cooking results when toasting paninis: - Always place paninis on the center of the bottom plate. - Toasting should take approximately 5–8 minutes. Exact toasting time will be a matter of preference and the type of bread and fillings used. For more tips and tricks, refer to Grilling Tips (page 20), Grilling Guide (page 23) and Recipes (page 28). Never use the leveling support to open the top cooking plate.
Operating your Breville PRODUCT 12. The grill features an optional countdown timer which monitors the time elapsed during cooking. To activate the count-down timer: a) Ensure the grill has completely preheated, the LCD screen no longer displays HEATING and food has been placed on the bottom cooking plate. b) Turn the timer dial to adjust the time in one minute increments up to 30 minutes. Rotate the dial clockwise to increase the time, or counterclockwise to reduce the time.
GRILLING TIPS
PAge header..... GRILLING tips GRILLING TIPS Meats Recommended cuts: • Beef - Sirloin (New York), Rump, Rib Eye (Scotch Fillet), Fillet. • Lamb - Trim Lamb Leg Steaks, Fillet, Eye of Loin, Cutlets and Diced Lamb. • Pork - Butterfly Loin Steaks, Spare Ribs, Leg Steaks, Fillets, Diced Pork. • It is not recommended to cook items with thick bones such as T-bone steaks. • Tougher cuts such as beef blade, topside steak, lamb forequarter or neck chops can be used.
PAge header..... GRILLING TIPS Medium well Cook on one side until moisture is pooling on top surface. Turn and cook on second side until moisture is pooling on top. Reduce heat slightly and continue to cook until steak feels firm with back of tongs. A meat thermometer will show the internal temperature of a medium well steak as 160–170°F (70–75°C). Well done Cook on one side until moisture is pooling on top surface. Turn and cook on second side until moisture is pooling on top.
GRILLING TIPS Grilling Guide The below cooking times are approximate and may need to be changed depending on variances in ingredient thickness and your personal taste. NOTE These times relate to when the grill is used as a contact grill. INGREDIENTS TYPE COOKING TIME Beef Sirloin steak 3 minutes for rare, 5–6 minutes for medium rare.
CARE & CLEANING for your Breville product
Care & cleaning Ensure the grill is turned OFF by turning the Temperature dial to the OFF position. The grill is OFF when the LCD screen displays OFF and the default ‘0’ zero time. Remove the power plug from the wall outlet. Allow the grill to cool completely before disassembling and cleaning. Always clean the outer body, drip tray and cooking plates after each use to prevent a build-up of ingredients.
Care & cleaning NOTE Storage The underside of the cooking plate may discolor over time and can form a layer of corrosion. This is normal. Any discoloration that may occur to either side of the cooking plate will only detract from the appearance of the plate and will not affect the cooking performance. To remove discoloration or corrosion, use a non-abrasive plastic scouring pad or nylon washing brush. Rinse and dry thoroughly. 1.
Care & cleaning ERROR MODE When the LCD screen displays ‘Err’ error mode: 1. Unplug the grill from the wall outlet 2. Ensure the grill is completely cool. 3. Ensure the cooking plates are correctly and securely inserted into position. 4. Re-insert the plug into the wall outlet. 5. The LCD screen should no longer display ‘Err’ error Mode. 6. If the problem continues, call Breville Customer Service.
RECIPES
MEAT AUSSIE BURGER MARINATED NEW YORK CUT STEAK Serves 4 Serves 4 Ingredients Ingredients 1lb (500g) ground beef 1 cup fresh bread crumbs 1 small onion, peeled and finely chopped 1 teaspoon crushed garlic 1 tablespoon chopped parsley 1 x 2oz (60g) egg, lightly beaten 1 cup red wine 2 tablespoons olive oil 1 tablespoon Dijon style mustard 1 teaspoon minced garlic 4 New York cut steaks, cut 1¼ in (3cm thick) To cook and serve Creamy mashed potato Crisp green salad 4 bacon rashers 4 hamburger buns or
MEAT CHILLI BEEF SALAD WITH CASHEWS Serves 4 Ingredients 1lb (500g) rump or sirloin steak 3 mild red chilies, chopped 2 tablespoons soy sauce 1 teaspoon crushed ginger ½ teaspoon crushed garlic Salad greens To serve ½ cup chopped cashew nuts Soy sauce Method 1. Preheat grill to SEAR temperature setting until the LCD screen no longer displays HEATING. 2. Slice steak into thin strips and combine with chili, soy, ginger and garlic. Allow to marinate for 20 minutes. 3.
MEAT RED wine AND Rosemary LAMB STEAKS Serves 8 Ingredients 8 x 4oz (125g) lamb steaks 2 tablespoons rosemary leaves 1 ⁄3 cup red wine Freshly ground black pepper ¼ teaspoon crushed garlic To serve Steamed green beans Method 1. Preheat grill to SEAR temperature setting until the LCD screen no longer displays HEATING. 2. Place steaks in a shallow dish. Combine rosemary, wine, pepper and garlic and pour over steaks. Allow to marinate for at least 20 minutes. 3.
CHICKEN TERIYAKI CHICKEN Fillets Serves 4 Ingredients 1 tablespoon mirin 2 tablespoons soy sauce 2 teaspoons caster sugar 2 teaspoons cooking sake 2 chicken breast fillets, halved lengthways To serve Lemon wedges Steamed rice Salad of green leaves Method 1. Preheat grill to SEAR temperature setting until the LCD screen no longer displays HEATING. 2. Combine mirin, soy sauce, sugar and sake. Place chicken in a stainless steel baking dish and pour prepared marinade over.
SEAFOOD LEMON AND Soy MARINATED SALMON Serves 4 as an entrée Ingredients 8oz (250g) piece salmon fillet, skin removed 2 tablespoons soy sauce 1 teaspoon wasabi paste 2 tablespoons lemon juice 2 teaspoons sesame oil To serve Pickled ginger Sautéed spinach Method 1. Preheat grill to SEAR temperature setting until the LCD screen no longer displays HEATING. 2. Cut salmon into 1cm thick slices. Combine soy, wasabi, lemon juice and sesame oil. Pour over salmon and allow to marinate for 20 minutes. 3.
Seafood BABY OCTOPUS WITH Chilli AND Garlic Atlantic Salmon STEAK WITH TARRAGON AND PEPPER CRUST Serves 4 Serves 4 Ingredients Ingredients 26oz (750g) baby octopus, cleaned 2 tablespoons olive oil 1 tablespoon Thai style sweet chilli sauce juice and zest of 1 lime 1 teaspoon commercially prepared minced garlic freshly ground black pepper To garnish; lime wedges coriander sprigs 2 tablespoons olive oil 2 tablespoons dried tarragon leaves freshly ground black pepper 4 Atlantic salmon steaks – weighing
SANDWICH BAGEL with SMOKED SALMON AND CAPERS SMOKED CHICKEN with BASIL AND FRESH MANGO Serves 4 Serves 4 Ingredients Ingredients 4 bagels – split 4 tablespoons cream cheese 8 slices smoked salmon 6 shallots, peeled and sliced finely lengthwise 1 tablespoon capers, drained and chopped 1 lemon Freshly ground black pepper 8 slices ‘large’ wholegrain pre-sliced bread butter or margarine 8oz (250g) sliced smoked chicken – smoked chickens are available from better delis and supermarkets (char-grilled rotis
Sandwich ROAST CHICKEN ROLL WITH SEMI-DRIED TOMATOES AND ROCKET Serves 4 Ingredients PASTRAMI ON TURKISH with MUSTARD MAYONNAISE Serves 6 Ingredients 4 slices pita bread 6 tablespoons mayonnaise 8oz (250g) sliced or chopped char-grill rotisserie chicken 1 cup semi-dried tomatoes, roughly chopped 1 bunch arugula leaves, roughly torn Freshly ground black pepper and sea salt 1 Turkish bread cut into 6 equal sections Butter or margarine 18 slices pastrami 6 tablespoons mustard mayonnaise 2 vine-ripened tomat
Sandwich/vegetarian TURKISH BREAD WITH SALAMI, BOCCONCINI AND PESTO GRILLED BABY BOK CHOY WITH Oyster SAUCE Serves 6 Serves 4 Ingredients Ingredients 1 Turkish bread cut into 6 equal sections Butter or margarine 18 slices Italian or Spanish salami 6 bocconcini slices 1 basket cherry tomatoes cut in half 1 cup pesto – available from better delis and Supermarkets 4 baby bok choy (2oz/50g each) 2 tablespoons soy sauce 1 tablespoon oyster sauce 2 tablespoons lemon juice 2 teaspoons brown sugar Method 1
FÉLICITATIONS pour l’achat de votre produit Breville Inscrivez-vous en ligne pour le soutien technique et les offres exclusives.* Consommateurs américains: www.brevilleusa.com Consommateurs canadiens: www.breville.ca *L’enregistrement n’est pas un substitut à la preuve d’achat lorsque vous soumettez une réclamation de garantie.
Table des matières 40 Brevillle vous recommande la sécurité avant tout 43 Faites la connaissance de votre produit Breville 46 Assemblage de votre produit Breville 48 Fonctionnement de votre produit Breville 57 Trucs de grillage 61 Entretien & nettoyage 65 Recettes 39
Breville vous recommande la sécurité avant tout Chez Breville, la sécurité occupe une place de choix. Nous concevons et fabriquons des produits destinés aux consommateurs sans jamais perdre de vue la sécurité de notre précieuse clientèle.
Breville vous recommande la sécurité avant tout • • • L’utilisation d’accessoires non recommandés par Breville peut causer des blessures. Ne laissez pas l’appareil sans surveillance lors de son utilisation. Une surveillance étroite est nécessaire lorsque l’appareil est utilisé par ou à proximité des enfants. IMPORTANTES MESURES DE SÉCURITÉ POUR TOUT APPAREIL ÉLECTRIQUE • • • • • • • Déroulez complètement le cordon d’alimentation avant l’usage.
Breville vous recommande la sécurité avant tout COURT CORDON D’ALIMENTATION Votre appareil Breville est muni d’un cordon d’alimentation court très sécuritaire qui réduit les risques de blessures corporelles ou les dommages pouvant être causés par le fait de tirer, trébucher ou s’enchevêtrer dans un cordon plus long.
FAITES LA CONNAISSANCE de votre produit Breville
PAge header..... FAITES LA CONNAISSANCE DE VOTRE PRODUIT BREVILLE P O A S’ouvre à plat en mode BBQ Surface de grillage de 260 po2 (1680 cm2) N M L B K C D J E F A. Boîtier en acier inoxydable Avec bras en métal moulé B. Plaques antiadhésives en aluminium moulé Recouvertes de QuantaniumMC infusé de titane résistant aux égratignures, pour une cuisson sans huile. C.
PAge header..... FAITES LA CONNAISSANCE DE VOTRE PRODUIT BREVILLE F. Cadran de minuterie de 30 min avec bip sonore Une pression au centre du bouton active le compte à rebours. G. Bouton de conversion de température Convertit les réglages par défaut Fahrenheit en degrés Celcius. H. Écran ACL affichant la température Rétroéclairé en bleu (mode attente) et orange (préchauffage/prêt). I. Cadran de température (160°C-230°C) Avec modes BAS, PANINI (sandwich) et SAISIR J. Rangement du cordon Logé sous le gril K.
ASSEMBLAGE de votre produit Breville
PAge header..... ASSEMBLAGE DE VOTRE PRODUIT BREVILLE Avant la première utilisation NOTE 1. Retirez du gril tout matériel d’emballage et étiquettes promotionnelles et jetez-les. Si les plaques de cuisson ne sont pas insérées correctement, l’écran ACL affichera ‘INSERT PLATE’. Utilisez les 2 boutons de dégagement pour retirer les plaques, puis réinsérez-les en les verrouillant en place. Assurez-vous que le gril est complètement refroidi avant de dégager et de retirer les plaques de cuisson. 2.
FONCTIONNEMENT de votre produit Breville
PAge header..... FONCTIONNEMENT DE VOTRE PRODUIT BREVILLE Usage comme gril ouvert en MODE BBQ Le gril s’ouvre à plat pour une surface de grillage de 260 po2 (1680 cm2). La plaque nervurée est idéale pour saisir les viandes tandis que la plaque inférieure convient à la cuisson des oeufs, des crêpes ou des légumes. 5. Le bip sonore se fera entendre et l’écran ACL affichera ‘OFF’ et le temps par défaut ‘0’ zéro. 1. Assurez-vous que le plateau d’égouttement est bien inséré dans le gril. 2.
PAge header..... FONCTIONNEMENT DE VOTRE PRODUIT BREVILLE NOTE Le gril est muni d’un bouton de conversion de température situé sur le côté gauche de l’écran ACL. Les degrés par défaut sont en Fahrenheit. Une seule pression sur le bouton de conversion de température les convertit en Celsius. Le symbole correspondant °F ou °C apparaîtra sur l’écran ACL. 8. Une fois que la température sélectionnée aura été atteinte, le bip sonore se fera entendre et ‘HEATING’ ne sera plus illuminé.
Operating your Breville FONCTIONNEMENT DE VOTRE PRODUCT PRODUIT BREVILLE c) De la main gauche, agrippez la poignée. De la main droite, tirez vers vous la clip de réglage de la hauteur, en position mode BBQ. Continuez de tirer sur la clip et, simultanément, levez la poignée pour ouvrir la plaque supérieure et l’abaisser délicatement à l’horizontale en mode BBQ. NOTE N’utilisez pas de vaporisateur ou d’enduits antiadhésifs, car ils pourraient affecter le rendement des plaques antiadhésives.
Operating your Breville FONCTIONNEMENT DE VOTRE PRODUCT PRODUIT BREVILLE NOTE NOTE Le compte à rebours peut être arrêté ou suspendu en tout temps, en pressant une seconde fois le bouton du cadran de minuterie. L’écran ACL n’affichera plus l’indicateur du compte à rebours. Cependant, le gril ne s’éteindra pas et continuera à chauffer. Pour réactiver ou désactiver la minuterie: - Tournez le cadran dans le sens horaire pour augmenter le temps de cuisson ou antihoraire pour le réduire.
FONCTIONNEMENT DE VOTRE PRODUIT BREVILLE NOTE Si les plaques ne sont pas correctement insérées, l’écran ACL affichera ‘INSERT PLATE’. À l’aide des 2 boutons de dégagement de plaques, retirez les plaques et réinsérez-les pour qu’elles se verrouillent en place. Assurez-vous que le gril est complètement refroidi avant de dégager et de retirer les plaques. Consultez la page 47 pour plus d’information sur la façon d’utiliser les boutons de dégagement des plaques.
PAge header..... FONCTIONNEMENT DE VOTRE PRODUIT BREVILLE 7. Pendant que le gril se réchauffe, ajustez l’angle de la plaque inférieure à la position désirée en tournant le cadran d’inclinaison de la plaque. Ce cadran est situé au bas du côté droit du gril. NOTE L’écran ACL peut afficher ‘HEATING’ durant la cuisson. Cela est normal et indique que la température requise est maintenue. NOTE Nous vous recommandons d’utiliser: - La position inclinée pour drainer les gras pour une cuisson santé.
PAge header..... FONCTIONNEMENT DE VOTRE PRODUIT BREVILLE NOTE L’écran ACL peut afficher ‘HEATING’ durant la cuisson. Cela est normal et indique que la température requise est maintenue. 11. Utilisez la poignée pour rabaisser la plaque supérieure. Cette plaque supérieure possède deux fonctions qui assurent des résultats optimaux: a) Plaque supérieure flottante. La plaque supérieure à charnière peut être positionnée à l’horizontale, juste au-dessus des aliments, pour une cuisson uniforme.
PAge header..... FONCTIONNEMENT DE VOTRE PRODUIT BREVILLE b) Tournez le cadran de minuterie pour le régler en gradations d’une minute jusqu’à 30 minutes. Tournez le cadran dans le sens horaire pour augmenter le temps de cuisson, ou dans le sens antihoraire pour le réduire. L’écran ACL affichera le temps sélectionné. c) Pressez une fois le bouton du cadran de minuterie afin d’activer le réglage. L’écran ACL affichera l’indicateur de compte à rebours et le compte à rebours débutera.
TRUCS DE GRILLAGE
TRUCS DE GRILLAGE TRUCS de grillage Viandes Coupes recommandées: • Boeuf - Surlonge (New York), rumsteck, oeil de ronde (faux filet), filet. • Agneau - Steak de gigot, filet, oeil de ronde, escalopes, cubes. • Porc - Steak de surlonge papillon, spare ribs, steak de gigot, filet, cubes. • Il n’est pas recommandé de cuire des viandes qui ont un gros os, comme les T-bone steaks.
TRUCS DE GRILLAGE Médium Cuire d’un côté jusqu’à ce qu’apparaissent quelques gouttelettes sur la surface. Tourner une seule fois. Cuire l’autre côté de la même façon. Le steak sera cuit médium quand il rebondira en le pressant avec le dos des pinces de cuisine. Un thermomètre à viande indiquera une température interne de 150160°F (65-70°C) pour un steak médium. À point Cuire d’un côté jusqu’à ce qu’apparaissent quelques gouttelettes sur la surface. Tourner et cuire l’autre côté de la même façon.
PAge header..... TRUCS DE GRILLAGE Guide de grillage NOTE Les temps de grillage indiqués ci-dessous sont approximatifs et peuvent être modifiés selon l’épaisseur des ingrédients utilisés ou vos goûts personnels. Les temps de grillage s’appliquent à l’usage du gril fermé.
ENTRETIEN & NETTOYAGE de votre produit Breville
PAge header..... ENTRETIEN & NETTOYAGE Assurez-vous que le gril est éteint en tournant le cadran de température à ‘OFF’. L’écran ACL affichera ‘OFF’ et le temps par défaut ‘0’ zéro. Débranchez l’appareil et laissez-le refroidir complètement avant de le démonter et de le nettoyer. Nettoyez toujours le boîtier, le plateau d’égouttement et les plaques de cuisson entre chaque usage afin de prévenir les accumulations de nourriture.
PAge header..... ENTRETIEN & NETTOYAGE 4. Ou encore, lavez les plaques à l’eau chaude savonneuse avec une éponge douce et humide. Un nettoyant liquide sans abrasif ou une solution légère en vaporisateur peuvent être utilisés pour empêcher l’accumulation de taches. Appliquez le nettoyant sur l’éponge et non sur le gril avant de le nettoyer. Nettoyez les résidus tenaces avec un tampon à récurer en plastique ou une brosse de nylon.
PAge header..... ENTRETIEN & NETTOYAGE Mode Erreur Quand l’écran ACL affiche ‘Err’ (Mode Erreur): 1. Débranchez le gril. 2. Laissez-le refroidir complètement. 3. Assurez-vous que les plaques de cuisson sont correctement insérées et verrouillées en place. 4. Rebranchez le gril. 5. L’écran ACL n’affichera plus ‘Err’ (Mode Erreur). 6. Si le problème persiste, contactez le Service aux consommateurs de Breville.
RECETTES
PAge header.....
PAge header.....
PAge header.....
PAge header.....
PAge header.....
PAge header.....
PAge header.....
PAge header.....
PAge header.....
PAge header..... RECETTES - SANDWICHS BÉBÉ PAK CHOI GRILLÉ & SAUCE D’HUÎTRES 2 portions INGRÉDIENTS 4 petits pak choi (50g / 2oz chacun) 2 cuillerées à soupe de sauce de soja 1 cuillerée à soupe de sauce d’huîtres 2 cuillerées à soupe de jus de citron 2 cuillerées à thé de sucre brun MARCHE À SUIVRE 1. Préchauffez le gril au réglage de température ‘SEAR’ jusqu’à ce que l’écran ACL n’affiche plus ‘HEATING’. 2. Enlevez les feuilles extérieures et coupez les pak choi en deux. Lavez-les soigneusement.