
Instruction manual


6
MobileMAX
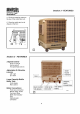
Section 5 - MAINTENANCE
• If the pads are reused they can
be easily cleaned by squirting them
with a hose. Do not use excess
pressure. This may create holes in
the pad.
• Remove the pad from the pad
frame , clean, and evenly
redistribute the wood wool over the
pad. Re-assemble the pad frame
• Inspect the pump and check that
it will freely rotate by hand. If it is
jammed with salt build-up, then
remove it and clean it thoroughly.
After cleaning the pump replace it
into the cooler, making sure that it
is securely in place.
• Check belt tension and adjust if
necessary.
• Lubricate motor bearings (if oiler
fitted) - only lightly.
• Replace the pad frames.
• Refill the tank.
• Restore electrical power supply
and follow Operating Instructions.
In-Season Maintenance
DAILY:
• Drain the water from the tank and
refill with fresh water.
MONTHLY:
• Turn off the electrical power
supply.
• Remove the pad frames.
• Inspect the pads and clean or
replace the material as required
(see Pre-Season Maintenance).
• Check the water level and adjust
the float if necessary.
• Check the pump operation.
• Clean the tank.
• Replace the pad frames.
• Restore electrical power supply
and follow Operating Instructions.
• Check that the wood-wool is
evenly distributed, and that there is
no gaps.
End Season Maintenance
• Turn off electrical power supply.
• Turn off water supply if
connected.
• Remove the pad frames. Hose
them down carefully, do not use
excess pressure as this may
create holes in the pad material
(see Pre-Season Maintenance).
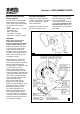
• Remove and clean the special
patented water "spreader plates"
located under the top panel of the
cooler, above each pad frame (see
Fig. 12, page 10, item 43). When
replacing them, ensure the
spreader is correctly locating in the
notches under the top panel,
halfway along the side.
It should not be necessary to
remove the spreader from the
hoses, simply clean them at the
cooler.
• Drain all the water from the
cooler.
• Clean the bottom pan/tank
thoroughly.
• Disconnect the water supply line.
Leave disconnected until next
season to prevent freezing and
splitting.
• Replace the pad frames.
• Cover the cooler for the winter or
store indoors.
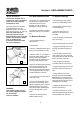
Motor Power (Amps)
Your cooler is fitted with an
adjustable motor pulley (sheave) to
enable the cooler to provide
maximum cooling. The adjustment
of the pulley must be done by a
trained, licensed technician using a
clip on ammeter Maximum amps
should not exceed the motor
nameplate amps.
Install all pad frames, except the
one on the motor side.
Set the cooler running at highest
speed for approximately ten (10)
minutes or until the motor has
reached its normal operating
temperature. Motor load must be
checked without the water pump
running.
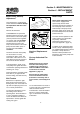
Locate the motor current test wire
in the terminal box. Measure the
motor current using a clip-on
ammeter (see Fig. 4, page 7). This
should be done by a trained,
licensed technician. Check the
measured amps against the
motor's nameplate rating.
If the measured amps are less
than the nameplate amps the
adjustable pulley may be altered to
increase the fan speed, thereby
delivering the full cooler capability
to your installation. The measured
amps should be equal or very
close to the motor's nameplate
amps (see heading Pulley
[Sheave] Adjustment below).
If the measured amps are
greater than the nameplate
amps the fan must be slowed by
adjusting the same pulley in the
opposite direction. Failure to do
this will overheat the motor
which may result in a fire.
Replace all covers when
adjustments are complete.