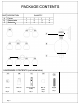
PACKAGE CONTENTS QUANTITY PART DESCRIPTION A Fixture C Socket rin B 1 1 1 Glass shade 1 2 2 1 3 3 1 4 4 ® I I ® I I I I I I I I © I I HARDWARE CONTENTS (not actual size) 8 @) @) @) �: 0 0 � � � @ Hex nut Wire nut Mounting strap (1/8IP) Ball nut (1/8IP) Nipple Qty:2 Qty:3 Qty:1 Qty:1 Qty:1 Page: 1
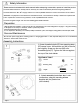
& Safety Information Please read and understand this entire manual before attempting to assemble, operate or install the product. CAUTION: Read instructions carefully and turn electricity off at main circuit breaker panel before beginning installation. CAUTION: Risk of fire. Min. 90 ° C supply conductors. Consult a qualified electrician to ensure correct branch circuit conductor.
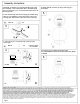
Assembly Instructions 3. Strip 3/8" of insulation from the electrical wire ends. Using wire nuts (BB), connect white fixture wire to the white supply wire from the junction box; connect the black fixture wire to the black supply wire. Connect the fixture ground wire and supply ground wire using a wire nut or by fastening to the ground screw on the round mounting plate. Push all wire connections into the outlet box. Wire nut � 5. Attach glass (B) to fixture (A) using socket ring (C) to secure tight.
lnstrucciones de ensamblaje e instalaci6n Precauci6n: Lea cuidadosamente las instrucciones y desconecte la electricidad del cortacircuitos principal antes de iniciar la instalaci6n. *************************************************************************************************************************************************************** PRECAUCl6N: Lea cuidadosamente las instrucciones ydesconecte la electricidad del cortacircuitos principal antes de iniciar la instalaci6n. PRECAUCl6N: Riesgo de fuego.