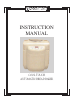
® INSTRUCTION MANUAL COOL TOUCH AUTOMATIC BREAD BAKER
TABLE OF CONTENTS Important Safeguards ..................................................... Additional Important Safeguards Polarized Plug ....................................... 2 .............................................................. 2 Your Breadman® Control Panel ........................................................... 3 .............................................................. 4 Using the Breadman® Baking Cycles 1 .....................................................
IMPORTANT SAFEGUARDS WHEN USING THE BREADMAN® COOL TOUCH AUTOMATIC BREAD BAKER, BASIC SAFETY PRECAUTIONS SHOULD ALWAYS BE FOLLOWED, PARTICULARLY THE FOLLOWING: 12. Do not place the appliance near a hot gas or electric burner, in a heated oven. 13. Keep the unit at least 2 inches away from walls or any other objects when using it. 1. READ ALL INSTRUCTIONS BEFORE USE. 14. To disconnect, grip the plug and pull the plug from the wall outlet. Never pull on the cord. 2. Do not touch hot surfaces.
ADDITIONAL IMPORTANT SAFEGUARDS WARNING: This appliance generates heat and escaping steam during use. Use proper precautions to prevent risk of burns, fires, or other injury to persons or damage to property. 1. Always use oven mitts when handling hot materials and allow metal parts to cool before cleaning. 2. Do not place the appliance on an unsteady or cloth-covered surface. 3. Keep the appliance at least 2 inches away from walls or any other objects when using it.
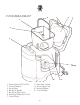
YOUR BREADMAN® 3. 4. 2. 1. 5. 6. 7. 8. (inside) 9. 10. 1. 2. 3. 4. 5. 6. 7. Removable Lid (P/N 21789) Viewing Window Steam Vents Bread Pan Handle Bread Pan (P/N 20101) Kneading Paddle (P/N 20102) Control Panel 8. 9. 10. 11. Drive Shaft (inside) Power Supply Cord Heating Element Oven Chamber 3 11.
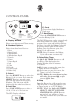
CONTROL PANEL Timer A. Light b. Medium C. Dark 1.Basic 2.Basic Rapid 3.Wholewheat 4.Wholewheat Rapid 5.French 6.Sweet 7.Super Rapid 8.Jam 9.Cake 10.Dough 11.Pasta Dough 12.Bake Only A. Display Window Shows your selection and Timer setting. B. Standard Options Select from these bread choices: 1. Basic 2. Basic Rapid 3. Wholewheat 4. Wholewheat Rapid 5. French 6. Sweet 7. Super Rapid 8. Jam 9. Cake 10. Dough 11. Pasta Dough 12. Bake Only C.
USING THE BREADMAN® Before using the Breadman® for the first time, carefully read all of the instructions included in this manual. With your new Breadman® Cool Touch Bread Baker: • You can use commonly available pre-packaged bread mixes. Follow the instructions on the package. • You can bake a loaf of bread from scratch. See the Recipe & Menu Planner included with your Breadman® Cool Touch Bread Baker for lots of tasty options.
USING THE BREADMAN® Operating Tips (CONTINUED) • Use oven mitts when working with bread or any part of the Breadman® that is hot from baking. • Wipe off crumbs and clean the Breadman®, as needed, after baking. • Unplug the Breadman® Cool Touch Baker when you are not using it. • It is normal for the Viewing Window to collect moisture during the Rise Cycle. As your food bakes, the moisture soon will evaporate so you can watch your bread’s baking progress.
USING THE BREADMAN® CAUTION (CONTINUED) • To protect young children, keep the Breadman® out of their reach when you’re not there to supervise — especially during the Kneading and Baking Cycles. • Use the Breadman® on a flat, hard surface. Don’t place it near a flame or heat, or on a soft surface (such as a carpet). Avoid placing it where it may tip over during use. Dropping the Breadman® could cause it to malfunction. • To avoid burns, stay clear of the Steam Vent during Kneading and Baking.
KNEADING AND BAKING CYCLES Fruit & Nut Add-In Beeper 60 Minute Keep Warm •The Crust Control feature lets you choose Light, Medium or Dark crusts for most bread varieties, including Basic, French, Sweet, and Wholewheat. •The French Cycle is for breads with crisper crusts, especially those that are lowest in fats, such as French and Italian breads. •Make delicious non-yeast cakes. •59 Minute Start-to-Finish Super Rapid Bread.
MAKING DOUGH AND BAKING BREAD Always use the freshest ingredients available. By carefully following the simple recipes that come with the Breadman®, you will be able to bake delicious bread every time. STEP 1 Open the Lid and remove the Bread Pan. Lift the Bread Pan straight up and out of the machine. STEP 2 Position the Kneading Paddle on the Drive Shaft as shown. Match the flat side of the Drive Shaft to the flat part of the hole in the Kneading Paddle. Make sure the Paddle is secure.
STEP 6 STEP 7 Press the SELECT Button to choose the Cycle you want. Each time the SELECT Button is pressed, it will beep and the number next to the Cycle on the Control Panel will correspond to the number in the Display Window. For instance, to choose the Basic Rapid Cycle, press the SELECT Button twice. The Display Window will read “2b” — the number of the Cycle chosen.
STEP 10 STEP 9 Press START/PAUSE Button to begin the Kneading Cycle. The time remaining will begin to count down in the Display Window. The Breadman® will begin mixing the ingredients for a minute. Then, it will begin the kneading process. During this process, the yeast will activate and normally the Viewing Window may begin to fog. (This will clear eventually so you can view the loaf’s progress).
STEP 11 Wearing oven mitts, remove the loaf from the Bread Pan onto an aerated cooling rack. Invert the Bread Pan a few inches above the countertop and cooling rack, and gently shake. Your loaf should slide easily out of the non-stick Bread Pan onto the rack. The cooling rack will prevent the loaf from retaining too much moisture. If necessary, remove the Kneading Paddle from the loaf. Sometimes the Kneading Paddle will stick in a loaf of bread.
USING THE DELAY BAKE TIMER 13 Hour Delay Bake Timer You can preset your Breadman® to delay baking from 10 minutes to 13 hours in advance. Caution NOTE: Do not use the Delay Bake Timer if your recipe includes eggs, fresh milk or other perishable ingredients that may spoil. To preset your Breadman®, follow these steps: 1. Add the ingredients as usual, taking care not to let the yeast and liquid ingredients contact one another. 2. Close the Breadman® Lid and plug it in. 3. Select the Baking Cycle you want.
USING THE DELAY BAKE TIMER For Best Results (CONTINUED) • Take care to measure ingredients accurately, using a good set of measuring cups and spoons, or a good scale. Make sure to level all dry ingredients as you measure them. Inaccurate measuring could cause unexpected results in your loaf of bread. • In particular, be precise in measuring the water. • Use fresh ingredients. • Since moisture is an enemy to flour, be sure to store your flour in an airtight container.
SUPER RAPID BREADS, AS EASY AS 1-2-3! The Super Rapid Cycle (7), with shorter Rise and Bake Cycles, is convenient for baking a hot, fresh loaf of bread in 59 minutes! The longer bread programs, with slower rise and bake times, will bake a taller, more developed loaf of bread. 1. Add ingredients to the Bread Pan in the order listed. Refer to Super Rapid Cycle Hints below for measuring information. Place the Bread Pan into the Bread Maker. 2. Close the Lid.
SUPER RAPID BREAD RECIPES We suggest starting your Super Rapid bread baking with this White Bread Recipe. To successfully bake loaf of bread using the Super Rapid Cycle: • Refer to Super Rapid Cycle Hints for measuring information. • Follow each step carefully. • Water temperature must be 100˚-115˚F / 43˚-46˚C. • Quick-Rise™ or RapidRise™ Bread Machine yeast must be used. White Bread 1 lb.
SUPER RAPID BREAD RECIPES Method (CONTINUED) 1. Remove the Bread Pan from the Bread Maker. Attach the Kneading Paddle onto the Shaft. Have all ingredients ready. Make sure all ingredients, except water, are at room temperature. 2. Use a liquid measuring cup to measure the water 100˚-115˚F / 43˚46˚C and pour into the Bread Pan. 3. Use a measuring spoon to measure the oil and add to the Bread Pan. 4.
SUPER RAPID BREAD RECIPES (CONTINUED) White Wheat Bread Water (100˚-115˚F/43˚-46˚C) Oil Sugar Salt Dry Milk Bread Flour Wholewheat Flour Super Rapid Type Yeast PROGRAM 1 lb. 2 lb. 3/4 cup + 3 tablespoons 1 tablespoon 3 tablespoons 1 teaspoon 1 tablespoon 1-3/4 cups 1/2 cup 4-1/2 teaspoons 7 1-1/2 cups + 3 tablespoons 3 tablespoons 1/4 cup 2 teaspoons 2 tablespoons 3-1/2 cups 1/2 cup 6 teaspoons 7 1 lb. 2 lb.
SUPER RAPID BREAD RECIPES (CONTINUED) Honey Granola Bread 2 lb. Water (100˚-115˚F/43˚-46˚C) Oil Honey Salt Dry Milk Bread Flour Granola Cereal Super Rapid Type Yeast PROGRAM 1-1/2 cups + 1 tablespoon 6 tablespoons 2-1/2 tablespoons 2 teaspoons 3 tablespoons 4-1/4 cups 1 cup 6-3/4 teaspoons 7 Cinnamon Raisin Bread Water (100˚-115˚F/43˚-46˚C) Oil Brown Sugar Salt Dry Milk Bread Flour Cinnamon Raisins Walnuts Super Rapid Type Yeast PROGRAM 1 lb. 2 lb.
JAM CYCLE INSTRUCTIONS The JAM Cycle (8) is very similar to the CAKE Cycle. Just add your ingredients and the Breadman® will do the rest. For Best Results • Do not reduce sugar or use sugar substitutes. The exact amounts of sugar, fruit, and pectin are necessary for a good set. • Use only ripe fruit (not overripe or underripe) for best flavor. • Do not puree fruit. Crush with a potato masher or food processor. Jam should have bits of fruit in it. • Recipes should not exceed 3-1/2 cups.
USING THE CAKE CYCLE The Breadman® Cake Cycle (9) is for non-yeast breads, such as banana bread, pumpkin bread or cake. Batter Breads usually call for quick-acting leavening agents such as baking powder or baking soda. The Breadman® will mix all of the ingredients and bake a cake-like bread in 1 hour 40 minutes. NOTE: These breads tend not to rise as high as yeast breads. For Best Results Basic cake recipes can be used as well as pre-packaged cake mixes.
DOUGH CYCLE INSTRUCTIONS • The Dough Cycle (10) is used to make a variety of bread types (with the exception of Pasta). • After the end of the first rise, remove the dough, shape the dough and bake it in a conventional oven. • Dough Cycle takes 1 hour 20 minutes. • The Breadman® will signal 5 minutes before it is finished Kneading, indicating when any additional ingredients such as dried fruits, nuts or herbs should be added. Pasta Dough • The Pasta Dough Cycle (11) simplifies Pasta Dough preparation.
CLEANING INSTRUCTIONS The Bread Pan and Kneading Paddle have non-stick surfaces that make cleaning easy. 1. After baking each loaf of bread, unplug the Breadman® and discard any crumbs. 2. Before cleaning, make sure the Breadman® is completely cooled. Remove the Bread Pan from the Oven and the Kneading Paddle from the Bread Pan. Then, as needed, wash the Bread Pan and Kneading Paddle inside and out with warm, soapy water. Avoid scratching the non-stick surfaces. DO NOT PUT THE BREAD PAN IN A DISHWASHER.
BASIC RAPID BREAD RECIPE IMPORTANT Weather conditions such as temperature, altitude or accuracy in measuring can effect the outcome of a loaf. We recommend that you use warm water (115˚F - 120˚F / 45˚C - 50˚C) for best results on the Deluxe Rapid Cycle. We also recommend using a Quick Rise or Rapid Rise Yeast. This yeast will speed the rising action. Basic White 1.5 lb. 2 lb.
BASIC RECIPE Rich Country Buttermilk Bread 1 lb. 1.5 lb. 2 lb.
TROUBLE SHOOTING Symptom Possible Solutions Display Window shows nothing Make sure the machine is plugged in. If nothing appears in the Display Window, unplug and plug in again. START Button doesn’t start the machine Make sure the machine is plugged in. If nothing appears in the Display Window, press SELECT to choose your Baking Cycle. (You must select a Baking Cycle before pressing START.) If the baking area is too hot, the Breadman® will not start because of an automatic safety feature.
TROUBLE SHOOTING (CONTINUED) Symptom Possible Solutions The Bread Machine does not bake the bread The Dough program was selected. To bake the bread, choose the appropriate program for baking bread. Bread has an offensive odor Check to be sure you added the correct amount of yeast. Measure carefully — too much yeast will cause an unpleasant odor and may cause the loaf to rise too high. Be sure to use only fresh ingredients.
TROUBLE SHOOTING (CONTINUED) Symptom Possible Solutions The bread didn’t rise at all Make sure yeast is not left out. Also check the date code on the yeast and that it is always the last ingredient put into the Pan. Make sure the yeast doesn’t come into contact with salt or any liquid ingredients. The dough looks like batter, or the dough ball is still sticky, not smooth and round During the Kneading process, add 1 tablespoon of flour at a time, letting it mix in well.
LIMITED ONE YEAR WARRANTY Warranty: This Breadman® product is warranted by Salton, Inc. to be free from defects in materials or workmanship for a period of (1) year from the original purchase date. This product warranty covers only the original consumer purchaser of the product.
IMPORTANT NOTICE If any parts are missing or defective, DO NOT return this product. Please call our Consumer Service Department for assistance. 800-233-9054 Monday - Friday 8am - 5pm CST Thank You Salton, Inc. Salton, Inc. 708 South Missouri Street If after reading this instruction booklet you still have questions about using the Breadman® Automatic Bread Machine, please write or call: Salton, Inc. P.O.