
Owner Manual


PAGE 5
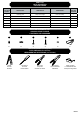
#1-7
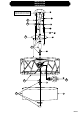
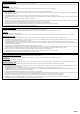
1. Disassemble the bolt (C), pass the electrical wires of the lamp (D) through the bolt (C) and the canopy (B). Install the bolt (C) onto the
lamp with provided nut. Strongly tighten the nut. Install the canopy (B) to the bolt (C) with the provided nut. Strongly tighten the nut.
2. Disassemble the bolt (D) and install it onto the lamp with provided nut.
3. Pass the electrical wires of the lamp through the mounting plate (A). Connect the lamp’s neutral (N) and live (L) wires to your own, using
the twist-cap connectors (EE). Fix the lamp’s grounding wire to the mounting plate (A) by wrapping it around the bolt, and then tightening the
EROW&RQQHFWWKHODPS¶VJURXQGLQJZLUHWR\RXUPDLQJURXQGLQJZLUHZLWKDWZLVWFDSFRQQHFWRU((6DIHO\VWXႇWKHZLUHVLQVLGH\RXURXWOHW
box.
4. Install the mounting plate (A) to your outlet box with bolts (BB).
5. Install the canopy (B) onto the mounting plate (A) with provided nuts. Strongly tighten the nuts.
6. Carefully install the bulbs (E) onto the lamp.
,QVWDOOWKHGLႇXVHU)RQWRWKHEROW'ZLWKWKHSURYLGHGZDVKHUDQGQXW
'pPRQWH]OHERXORQ&IDLWHVSDVVHUOHV¿OVpOHFWULTXHVGHODODPSH'jWUDYHUVOHERXORQ&HWODYHUULqUH%,QVWDOOH]OHERXORQ&
sur la lampe avec l’écrou fourni. Serrer fermement l’écrou. Installez le capot (B) sur le boulon (C) à l’aide de l’écrou fourni. Serrer fermement
l’écrou.
2. Démontez le boulon (D) et installez-le sur la lampe avec l’écrou fourni.
3DVVH]OHV¿OVpOHFWULTXHVGHODODPSHDXFHQWUHGHODSODTXHGHPRQWDJH$&RQQHFWH]OH¿OVRXVWHQVLRQ/HWOH¿OQHXWUH1GHOD
ODPSHjYRV¿OVHQXWLOLVDQWOHVFDSXFKRQVGHFRQQH[LRQGpYLVVDEOHV(()L[H]OH¿OGHPLVHjODWHUUHGHODODPSHjODSODTXHGHPRQWDJH
$HQO¶HQURXODQWDXWRXUGXERXORQHWHQVXLWHVHUUHUELHQOHERXORQ&RQQHFWH]OH¿OGHPLVHjODWHUUHGHODODPSHjYRWUHSURSUH¿OGHPLVH
jODWHUUHHQXWLOLVDQWOHFDSXFKRQGHFRQQH[LRQGpYLVVDEOH((6RLJQHXVHPHQWLQVpUH]OHV¿OVGDQVODERvWHGHVRUWLH
4. Installez la plaque de montage (A) à votre boîte de sortie avec les boulons (BB).
5. Installer la base (B) sur la plaque de montage (A) avec les écrous fourni. Serrer fermement les écrous.
6. Installez avec précaution les ampoules (E) dans la lampe.
,QVWDOOH]OHGLႇXVHXU)VXUOHERXORQ'DYHFODURQGHOOHHWO¶pFURXIRXUQLV
1. Desmonte el perno (C), pase los cables eléctricos de la lámpara (D) a través del perno (C) y la cubierta (B). Instale el perno (C) en la
lámpara con la tuerca suministrada. Apriete fuertemente la tuerca. Instale el toldo (B) en el perno (C) con la tuerca suministrada. Apriete
fuertemente la tuerca.
2. Desmonte el perno (D) e instálelo en la lámpara con la tuerca suministrada.
3. Pasar los cables eléctricos de la lámpara a través de la placa de montaje (A). Conecte el cable neutro (N) y el cable conductor (L) a
su cuenta usando los conectores con cabeza de rosca (EE). Sujete el polo a tierra de la lámpara a la placa de montaje (A) envolviéndolo
alrededor del perno y apriete bien el perno. Conecte el polo a tierra de la lámpara a su polo a tierra con el conector con cabeza de rosca
(EE). Cuidadosamente coloque los cables en el interior de la caja de salida.
4. Instale la placa de montaje (A) a la caja de salida con los pernos (BB).
5. Instale la base (B) en la placa de montaje (A) con las tuercas proporcionada. Apretar fuertemente las tuercas.
6. Cuidadosamente instalar las bombillas (E) en la lámpara.
7. Instale el difusor (F) en el perno (D) con la arandela y la tuerca suministradas.
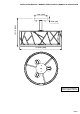
INSTALLATION
INSTALLATION
INSTALACIÓN
Outlet box (not supplied)
Boîte de sortie (non fournie)
Caja de salida (no incluida)
B
3
AA
CC
BB
4
DD
OR
A
5
EE