
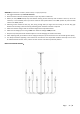
Installation & Assembly

Page: - 3 - / 4
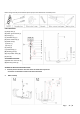
Sept A1:Screw the tubes (K) onto the fixture body (M).
Sept A2: Adjust the elbow (O) to the proper position.
Adjust the direction of the steering joints (M) vertically and place the Lamp holder casing (N) at the bottom.
3. Make pre-installation
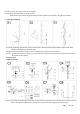
Step B1:
By measuring, determine the correct number of links needed for proper hanging height. Using the chain pliers,
disconnect and discard the remaining chain.
Step B2: Attach a quick link(H) to loop(J) on the top tube(K) and to connect the end of chain(I).
Step B3: : Carefully lace the wires through the chain (I)(every other link)and stop just before you reach the top of chain (I).
Gently pull the wires tillsnug.
4.Turn off power
5. Make installation
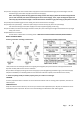
Step C1: Remove the threaded ring (F) from collar loop(G). Attach the single bar (C) to outlet box with mounting screws (B).
The side of single bar marked "GND" must face out, Unscrew the collar ring (H) from the collar loop.