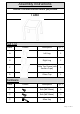
Assembly Instructions Caution: You must read this before you proceed Table Part List Label Picture Description QTY A Left Leg 1 B Right Leg 1 C Table Top Frame (with Suction Cups) 1 D Glass Top 1 Description QTY ① Bolt (M6*20mm) 5 ② Bolt (M6*25mm) 5 ③ Allen Key 1 Hardware Label Picture Page 1 OF 6
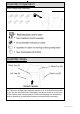
Assembly Preparation Before Beginning Assembly: Assembly Steps Table Top (C) Glass Top (D) Right Leg (B) Left Leg (A) FRONT FACING This Table has multiple parts and may require up to 30 minutes to assemble. To give you an overview of the Table parts, the above picture is to help you put the various parts into perspective. Please read through the instructions below to familiarise yourself with the parts and steps before assembly.
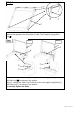
Step 1 ③ C C Take out the guards in the four ends of Table Top Frame(C) using Allen Key(③). Step 2 setp2.2 setp2.1 C C A A ② ③ ③ ① Step2.1:Attach the Table Top Frame(C) to the Left Leg(A) using Bolts(②) with Allen Key(③) as shown in the picture. Step2.2:Attach the Table Top Frame(C) to the Left Leg(A) using Bolts(①) with Allen Key(③) as shown in the picture. Do not fully tighten the Bolts.
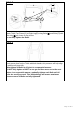
Step 3 ③ A ① C ③ ② B Attach Table Top Frame(C) to Right Leg(B) using Bolts(①) and Bolts(②)with Allen Key(③) as shown in the picture. Do not fully tighten the Bolts. Step 4 Stand the Table up. Firmly press down on the Table with both hands, this pressure will help align all parts at all joints fully. Then tighten all Bolts at all joints in a sequential manner. DO NOT fully tighten a BOLT in one go and then move on to the next.
Step 5 Place the Glass Top(D) on the assembled Table Frame. Caution: The Table and its Parts are Heavy. Two adults are required for lifting and moving them. Step 6 Your Table is ready for use. This Table can only be used on a flat, level surface. Stand the Ottoman up. Put Cushion(C) on the Ottoman Your Ottoman is ready for use. Place the Ottoman on a LEVEL SURFACE. Inspect it and make sure all parts are adequately connected.
Page 6 OF 6