
Installation Instruction

PREPARAION
1. Carefully unpack your new xture, lay out all the parts
on a clear area. Be careful not to lose any small parts
necessary for installation.
2. Remove the mounting screws (D1) from the xture.
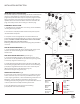
PORTABLE INSTALLATION (Fig. 1)
3. Drill holes in the wall aligned with the key-hole
location in the mounting plate (B1).
4. Insert the plastic anchors (A1). Insert the wood screws
(C1) into the plastic anchors (A1) leaving enough length
to hang the mounting plate (B1).
5. Hang the mounting plate (B1) and tighten the wood
screws (C1) until the mounting plate (B1) is secured to
the wall.
6. Place the xture over the mounting plate (B1) and secure
it with the mounting screws (D1).
7. Install optional cord cover if desired. Drill holes in the wall
aligned with the hole locations in the cord bracket (G1).
Insert the plastic anchors (A1) into wall. Secure the bracket (G1)
to the wall with the wood screws (C1).
8. Place the cord into the bracket (G1).
Snap the cord cover (H1) over the cord bracket.
9. Plug into outlet.
10. This lamp features has a dimmer switch. Press and release
to turn on / o. When xture is on, press and hold the switch
to cycle from dim to bright and release when desired brightness is reached.
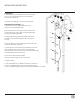
FIG.1
A1
B1
C1
E1
D1
H1
G1
cord cover
mounting
screws
bracket
anchors
mounting
plate
wood
screws
Fixture
INSTALLATION INSTRUCTION