
Installation & Assembly
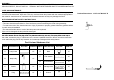

PREPARATION
Before beginning assembly of product, make sure all parts are present. Compare parts with package contents list and hardware
contents list. If any part is missing or damaged, do not attempt to assemble the product.
E ti t d A bl Ti 15 i t
Estimated Assembly Time: 15 minutes.
PLEASE USE ON/OFF TYPE"A" BULB MAX 40-WATT OR CFL BULB MAX 13-WATT OR LED BULB MAX9-WATT
THERE IS LED 4-WATT BULB IN THE BOX
2
C
D
E
A
B
3
F
G
H
I
A
B2
B1
1
2
C
D
E
A
B
3
F
G
H
I
A
B2
B1
1
2
C
D
E
A
B
3
F
G
H
I
A
B2
B1
1
2
C
D
E
A
B
3
F
G
H
I
A
B2
B1
1
2
C
D
E
A
B
3
F
G
H
I
A
B2
B1
1
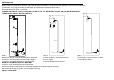
Step 1 Step 2 Step 3
Make sure all parts could be aligned before assemble Put the shade(C ) onto the socket and Put the light on a level surface to check
screw the Lamp body (B2) onto the Lamp body(B1); fix it by ring(D) if everything is stable.
screw the Lamp base(A)onto the Lamp body(B2); Insert the bulb(E)into the socket
screw the Flat washer(F)onto the Lamp base;
2
C
D
E
A
B
3
F
G
H
I
A
B2
B1
1
screw
th
e
Fl
a
t
was
h
er
(F)
on
t
o
th
e
L
amp
b
ase;
screw the Tooth washer(G)onto the Flat washer ;
screw the Hexagon nut(H)onto the Tooth washer(G)with wrench(I)and tighten securely;
Be careful not to twist the power cord and tighten securely
ENJOY YOUR LAMP
2
C
D
E
A
B
3
F
G
H
I
A
B2
B1
1
2
C
D
E
A
B
3
F
G
H
I
A
B2
B1
1