
Assembly & Installation Instructions


(3x12”)
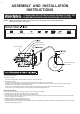
Plug-in Installation
a. Feed the plug-in wire through the rods(L) based on the Height of the
fixture you want.
b. Take off the plug(M) on the back plate, let the plug-in wire through the
plug, plug hole and the strain relief(C).
c. Cut excess plug-in wire. Leave 10 inches from the back plate. Slit the
plug-in wire apart in 5 inches. Peel off insulation of the two wires in
5/8 inch.(See Fig.2)
d. Secure the threaded pipe of the rod with hex nut(D) as well as
washer(E).
e. Connect the wires:
1) The black wire from the back plate to the smooth wire (marked)
from the plug cord.
2) The white wire from the back plate to the ridged wire (unmarked)
from the plug cord.
3) Carefully put the wires back into the back plate.
f. Fasten the fixture body with four flat head screws.
g. Attach the rod strap(G) to the connected rod(L) at the bottom, then
secure it to the wall using dry wall screws.
Anchors for cement wall.
h. Install the bulb (not included,Medium base Max 60W)
i. Install glass shade: Tilt the glass shade and slide glass holder into the
glass shade carefully, Make sure that the glass holder in the center of
glass shade and then tighten the lock nut.
Plug-in Wire
Rods(L)
Plug(K)
Strain Relief(C)
Mounting Screw(A) Wire Connector(B) Strain Relief(C) Hex Nut(D) Washer(E) Anchor(F) Rod Strap(G) Dry Wall Screw(H)