Caution : You must read this before you proceed Sofa Corner Label Picture Description QTY A Side Panel 1 B Back Support Bar 1 C Seat Panel (Labeled with 'face' and 'bottom') 1 D Leg Support Bar 1 E Seat Cushion 1 F Back Cushion 2 1 OF 7
Label Picture Description QTY ① Bolt (M6*20MM) 11 ② Allen Key 1 Before Beginning Assembly: 2 OF 7
Overview Back Support Bar(B) Back Cushion(F) Side Panel(A) Leg Support Bar(D) Seat Panel(C) Seat Cushion(E) FRONT FACING This Sofa Corner has multiple parts and may require up to 30 minutes to assemble. To give you an overview of the Sofa parts, the above picture is to help you put the various parts into perspective. Please read through the instructions below to familiarise yourself with the parts and steps before assembly.
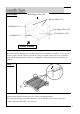
Step 2 Place the Side Panel(A) with its inside facing up. Insert the Seat Panel(C) into the Side Panel(A). Step 3 3.1) Attach the Seat Panel(C) to Side Panel(A) using Bolts(①) with Allen Key(②) as shown above. 3.2) Attach the Seat Panel(C) to Side Panel(A) using Bolts(①) with Allen Key(②) as shown above.
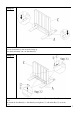
Step 4 4.1) Remove the plastic plugs( prevent the alum tube was scratched) in the both ends of Back Support Bar (B) using Allen Key(②) as shown above. 4.2) Insert the Back Support Bar(B) into the Side Panel(A). Step 5 Attach the Back Support Bar(B) to the Side Panel(A) using Bolt(①) with Allen Key(②). Do not fully tigthen Bolts.
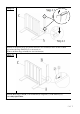
Step 6 Insert the Leg Support Bar(D) into the Back Support Bar(B) and Seat Panel(C) as shown above. Step 7 7.1) Attach the Leg Support Bar(D) to Back Support Bar(B) and Seat Panel(C) using Bolts(①) with Allen Key(②) as shown above. 7.2) Attach the Leg Support Bar(D) to Back Support Bar(B) using Bolts(①) with Allen Key(②) as shown above. Do not fully tigthen Bolts.
Step 8 Stand the Sofa Corner up. Place the Sofa Corner on a LEVEL SURFACE. Inspect it and make sure all parts are adequately connected. Gently and carefully, sit onto the Sofa Corner. This will help to align all the parts at all joints. Then get off the Sofa Corner, and in a sequential manner, proceed to tighten all Bolts. When tightening the Bolts, tighten sequentially. DO NOT tighten any Bolt fully and then move on to the next one. This may cause the frame to warp.