
Assembly Instruction

I
f
I
I
Assemb
l
y
i
s
comple
t
ed
Tha
n
k
You
F
or Your
P
u
rchase
·,
1 .
/
(?-
\
~
---
-----
----
-·
- -
--
P
l
e
a
se
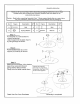
p
ay
specia
l
a
ttenti
o
n
t
o
re
p
e
a
t
e
d
i
nspe
ct
i
o
n
the
fo
u
r
PC
S
sc
r
e
w
m
u
s
t
ti
g
ht
e
n.
Attach the
I
ron bracket (4) to
botto
m
~~~~~~~~~
~
base (3) by
us
in
g
bolt (A) and
spring washer (B) as
shown
.
Fina
ll
y, turn
t
h
e table unside down.
Step
3
:
P
ut
th
e
bo
tt
o
m
ba
se
(
3) on
th
e
s
u
ppo
rt (2)
c
a
r
e
full
y as
sh
ow
n.
'
·
/
Step
2
:
Pu
t
a
ll parts
o
n a
so
f
t
s
urf
ace
t
o
p
r
eve
n
t
sc
r
atches
.
Attach support (2) to
g
l
ass
T
op
(
1 )
by
us
i
ng bolt (C) as
shown
.
Step
1:
No
F
i
gure
Descr
i
ption
QTY No Figure
Descr
i
ption
Q
T
Y
@)
nrn1rn
)
rn
1
i
B
olt
c
i
Bolt
A
4
1
B
e
Sp
ri
ng Washer 4
D
/
Wrench
1
Cau
ti
o
n
:
Read
befo
r
e
un
pac
kin
g
Assembly
Parts
.
"
Shar
p exposed
stap
l
e tips
c
an
ca
u
se
inju
ry.
Fo
r
you
r
protection
,
please
r
e
m
ove any exposed
s
t
a
p
les used in packaging
.
Than
k
you for
yo
u
r
purc
h
ase
.
Before
disca
rdi
n
g
pac
k
ag
in
g
m
ate
ri
al be sure you
h
av
e
lo
cated
a
ll
t
h
e
parts
includ
i
ng
t
he necessary
ha
r
dware and
too
l
s listed on
the
i
n
struct
i
on
sheet
be
l
ow
.
Assemb
l
y
I
n
struct
i
o
n