
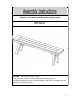
Assembly Instructions

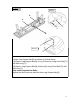
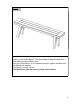

Step 4
Stand the Bench right side up.
Gently, sit into to the Bench. This would help to align all parts at all
joints and to protect wobble issue.
Then get off the Bench, in a sequential manner, tighten all Bolts until
fully locked into position.
Your Bench is ready for use.
This Bench can only be used on a flat, level surface.
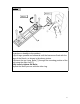
③
①
③
①
②
③
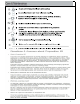
Step 3.1
②
③
Step 3.2
A
A
B
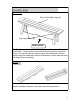
Step 2.1
Step 2.2
Bench Seat With Legs (A)
Leg Support Bar (B)
FRONT FACING
Leg
Keep away from sources of ignition.
Dust and pick-up spills using a clean, non-colored, lint-free cloth .
③
①
③
①
②
③
Step 3.1
②
③
Step 3.2
A
A
B
Step 2.1
Step 2.2
Bench Seat With Legs (A)
Leg Support Bar (B)
FRONT FACING
Leg
Do not clean furniture with harsh cleansers or polish.
To obtain the longest lifespan of your outdoor prodcts, minimizing exposure to
direct sunlight is recommended.
Children should not climb or jump on the furniture.
Do not write on furniture without a padded barrier to protect the surface.
To obtain the longest lifespan of your outdoor products, avoid extended
and lengthy exposure to rain, snow, and direct sunshine. Whenever
possible cover the product and /or place under patio or awnings.
Keep away from sources of ignition.
Dust and pick-up spills using a clean, non-colored, lint-free cloth .
This Bench can only be used on a flat, level surface.
Stand the Bench right side up.
Gently, sit into to the Bench. This would help to align all parts at all
joints and to protect wobble issue.
Then get off the Bench, in a sequential manner, tighten all Bolts until
fully locked into position.
Your Bench is ready for use.
6