
Installation & Assembly

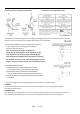

WIRESTOGROUNDWIRES
ConnectgroundwireaccordingtobelowchartConnectwiresaccordingtobelowchart
Twistplasticwireconnector(L)untilwiresaretightlyjoinedtogether,wrapeachconnectorwithapprovedelectrical
tapeformoresecureconnectionandcarefullystuffallwiresintotheoutletbox
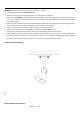
5.Remove
knob balls(F)fromthemountingplateassembly(B).
Fitthecanopy(E)tothemountingplateassembly(B)
Andsecurewithknobballs(F)
Note:Thecanopy(A)shouldbesnugagainstthe
ceiling and the mounting balls. If not, adjust the length
of the nipples on the mounting plate assembly (B) by
unscrewing the preassembled hex nuts and then screwing
the mounting screws in or out of the mounting plate until the
length is achieved. Tighten the hex nuts and
proceed to step 7
6. Install bulb & adjust position
1) Install bulbs (not included) (Please do not exceed
the maximum capacity recommended on the socket.)
2) Unscrew the stud (H) to adjust the metal shade (I),
once the desired position is achieved, tighten the stud (H)
3) Adjust the bracket (G) to right or left till your desired position
is achieved.
7.
Checkeverythingisalreadyinstalledproperly,thenyoucouldturnonthelight.Enjoy!
CLEANING
Toclean,wipefixturewithasoftcloth.Donotuseabrasivematerialssuchasscouringpadsorpowders,
steelwoolorabrasivepaper.
ORDERINGPARTS
Keepthissheetforfuturereference,andincaseyouneedtoorderreplacementparts.Allpartsforthisfixturecan
beorderedfromplaceofpurchase.Besuretouseexactwordingfromillustrationwhenorderingparts.
Page: ‐3‐/3