
Installation & Assembly


Beforedoingassemblyandinstallationpleasepreparetheneededtoolsasbelowpicture
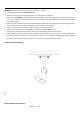
PARTSTYPE&QTYINCLUDING:
(B) Mounting plate assembly (1)
(C) Green ground screw (1)
(E) Canopy (1)
(F) Knob nut (2)
(G)
Bracket (1)
(H) Stud (2)
(I) Metal shade (1)
ACCESSORIES&QTYENCLOSED:
(A) Plastic wire connector (3)
(D) Mounting screw (2)
ASSEMBLY&INSTALLATIONINSTRUCTIONS:
1. Carefullyremovethefixturefromthecartonandcheckthatallpartsand
accessoriesareincludedasshownintheaboveillustration
2. Turnoffpower.
Beforeyoustarttomakeinstallation,NEVERattemptanyworkwithoutshuttingofftheelectricityuntiltheworkis
done.A).Gotothemainfuse,orcircuitbreaker,boxinyourhome.Placethemainpowerswitchinthe“OFF”position.
B).Placethewallswitchinthe“OFF”position.
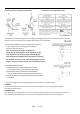
3. Makemountingplateinstallation
1) Carefullypassthewiresfromoutletboxthroughthemountingplate
assembly(B).Thesideofthemountingplateassembly(B)marked
"GND"mustfaceout
2)Attachthemountingplateassembly(B)tooutletboxwith
outletboxscrews(D).
4.Makewireconnections
Connectwiresasbelowwiresconnectingshown.TAKENOTEOFYOURCOLOROFFIXTURE,NEVERCONNECT
Page: ‐2‐/3