
Installation Guide


Installation Guide
ON
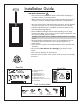
Tools You May Need
GOGGLES
TAPE MEASURE
RUBBER
GLOVES
PHILLIPS
LADDER
DRILL
SCREW DRIVER
Circuit Box
Please read and comprehend the entire manual before attempting to
assemble, operate, or install the product.
LED INFO & WARNINGS
•
•
All parts must be used as indicated in these instructions. Do not substitute
any parts, leave parts out, or use any parts that are worn or broken.
•
Inspect the LED fixture prior to installation to make sure that it has not
been damaged during shipping.
•
•
•
•
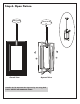
Shut “OFF” the electricity at main fuse box.
•
•
Parts List
A.
B.
C.
D.
E.
F.
G.
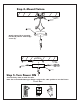
H. Down Rods
A
F
B
C
D
E
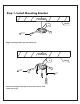
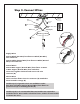
Mounting Bracket
Outlet Screws x 4
Wire Connectors x 3
Ground Screw x 1
Canopy Screws x 3
Canopy
G
Wire Clips x 2 (Located in Canopy)
H
Make sure that you have all necessary parts by checking the parts list. If
any part is missing or damaged, please contact us for a replacement.
Please handle the LED light with care when unpacking. Do not apply
pressure to the LEDʼs, do not open any factory sealed compartments, and
do not touch the LEDs with your hands.
We highly recommend to use a qualified, licensed electrician to install the
fixture.
We recommend to install the fixture on its own independent circuit. Do
not install the fixture on the same circuit with other appliances, or
HVAC systems.
•
Do not remove or replace our manufactured driver that is provided
with
the fixture.
We recommend ELV (Electric Low Voltage) type dimmers for this
fixture.
Place the wall switch in the “OFF” position of the room you are installing
the fixture.