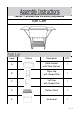
Caution : You must read this before you proceed Bar Cart Picture Label Picture Description QTY A Metal Basket (with Side Shelves) 1 B Right Leg (with Support Bar) 1 C Left Leg (with Support Bar) 1 D Bottom Shelf 1 E Ice Bucket 1 1 OF 6
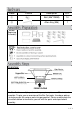
Label Picture Description QTY ① Bolt (M6*12MM) 14 ② Allen Key (M6) 1 Before Beginning Assembly: Overview Side Shelve Support Bar BASKET(A) LEFT LEG(C) RIGHT LEG(B) BOTTOM SHELF(D) FRONT FACING This Bar Cart has multiple parts and may require up to some 30 minutes to assemble. To give you an overview of the Bar Cart parts, the above picture is to help you put the various parts into perspective.
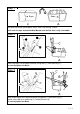
Step 1 Rope Rope Turn Metal Basket(A) upside down, onto a clean, non-marring surface. Don't untie the rope around the Metal Basket until the Bar Cart is fully assembled. Step 2 ② ① ② ① Attach Left Leg(C) to the Metal Basket(A) using Bolts(①) with Allen Key(②). Do not fully tighten the Bolts. Step 3 Attach Right Leg(B) to the Metal Basket(A) using Bolts(①) with Allen Key(②). Repeat same step to assemble leg (C) to Metal Basket (A). Do not fully tighten the Bolts.
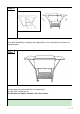
Step 4 ① ② 4.1) Align the Bottom Shelf(D) to mounting positions betweem Right Leg(B) and Left Leg(C). 4.2) Attach the Bottom Shelf(D) to Right Leg(B) and Left Leg(C) using Bolts(①) with Allen Key(②). Do not fully tighten the Bolts. This step is done best with the assistance of a second adult. Step 5 Stand the Bar Cart up. Place the Bar Cart on a LEVEL SURFACE. With assistance from your adult partner, apply firm, even pressure on the Bar cart. This will help to align all parts at all joints.
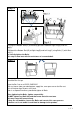
Step 6 Lift up both Side Shelves and place the Support Bars in the underside of the Shelves to prop them open. Step 7 Untie the rope from around the Bar Cart and discard. Your Bar Cart is ready for use. This Bar Cart can only be used on a flat, level surface.
OF 6