
Installation & Assembly
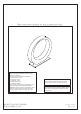

Locate all hardware & components before discarding packaging
Page 2 of (2)
FOR USE ONLY WITH 12V LOW VOLTAGE LANDSCAPE POWER UNITS THAT DO NOT EXCEED 25 AMPS, 15 VOLT MAXIMUM.
WARNING: Luminaires must be installed in accordance with the National Electrical Code (NEC) and local codes. Failure to do so will
void thewarranty and may result in serious injury and/or damage to the luminaire.
LUMINAIRES ARE NOT TO BE INSTALLED WITHIN 10 FT. (3.05M) OF A POOL OR SPA. SECONDARY CABLE IS NOT TO BE BURIED MORE
THAN 6”. WHEN USINGMULTIPLE LUMINAIRES, LOAD IS NOT TO EXCEED THE TOTAL WATTS OF TRANSFORMER RATING. DO NOT
USE EXTENSION CORDS ON POWER UNITS.
NOTE: Always use UL recognized wire connectors for connections.
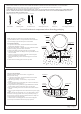
Ground Stake Installation
1. To prevent electrical shock, disconnect transformer from electrical
supply before installation or service.
2. Dig a hole approximately 3” diameter by 2” deep at selected location.
3. Remove mounting plate from bottom of luminaire.
4. Attach ground stake to mounting plate with 2 screws supplied
5. Thread 18/2 direct burial wire through center of ground stake and out
exit hole of stake.
6. Connect 18/2 pigtail to main power cable with connector supllied.
Turn on power supply to test connection.
7. Push ground stake into ground so that mounting plate is level with
ground.
8. Attach fixture to mounting plate with screws provided.
Concrete Footing Installation
Installation requires conduit sleeve to allow 36” pigtail to exit
through concrete footing.
1. To prevent electrical shock, disconnect transformer from electrical
supply before installation or service.
2. Dig a hole approximately 12” diameter by 6” deep at selected
location.
3. Install foundation anchors to mounting plate. Position conduit sleeve
to be center hole in mounting plate.
4. Using standard masonry procedures, support bollard base in selected
location making mounting plate remain above concrete grade.
5. Pour concrete making sure exit end of conduit sleeve reaches outside
concrete.
6. Run wire pigtail through bottom sleeve and attach to main power supply
cable.
NOTE: Luminaires are supplied with 36” of 18-2 cable pigtail for secure
connection to main supply cable. Wire is to be protected by routing in
close proximity to luminaire. Wiring should be buried a max. depth of 6”
in order to connect to main supply cable.
7. Attach luminaire to mounting plate and secure with nuts supplied.
8. Provide power to luminaire and check for proper operation.
Bollard Post
Main Supply
Cable
Soil
36"Pigtail
Low Voltage
Connector
Bollard Post
Concrete
Foundation
Anchor Rods
Mounting Plate
(B)
(C)
Anchor Rods (x2)
(D)
Mounting Screws (x2)
(E)
Screws (x2)
(F)
Low Voltage Connector (x1)
(A)
Ground Stake
NOTE:
This light is provided with a ground stake to
facilitate an
in-grade installation. However, for a permanent and secure installation
a concrete footing support for bollard post is recommended.