
Installation Instructions

INSTALLATION INSTRUCTIONS
2OF4
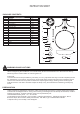
STEP 1:
a Unfold Support Arms at 120 degree locations as shown..
STEP 2:
a Locate the holes on the Ring over the Bolts on the ends of
Support Arms. Secure by threading Lock Balls onto the
Bolts. Hand tighten until snug.
.
120 Degree
Support
Arm
SupportArm
Socket
Assembly
Lock Ball
Ring
Bolt
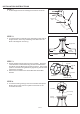
STEP 3:
a Screw the Mounting Screws into the Crossbar place the
Lock Washers over the Mounting Screws and thread the
Hex Nuts onto the Mounting Screws as shown Secure the
position of the Mounting Screws by tightening the Hex Nuts
against the Crossbar
b Secure the Crossbar to the Outlet Box with Outlet Box
Screws
.,
.
.
.
.
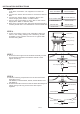
STEP 4:
a Locate the Ceiling Canopy onto the Crossbar and slip the
Button Stop on the end of Lanyard into the Slot on the
Crossbar as shown.
.
Outlet Box
Crossbar
Mounting Screw
Hex Nut
Outlet Box Screw
Lock Washer
Slot
Lanyard
Ceiling
Canopy
Crossbar
Button Stop