
Assembly Instructions

Assembly Instructions (English)
ASSEMBLY INSTRUCTIONS FOR
1. Remove all parts and lay on a flat surface.
2. Screw pole (B) clockwise into base (A) to tighten.
3. Screw pole (C) clockwise into pole (B) to tighten.
4.Screw pole (D) clockwise into pole (C) to tighten.
5. Screw pole (E) clockwise into pole (D) to tighten,
and pull the remaining slack of the power
cord out carefully through point (F).
6. Screw ST bulb (E) clockwise into socket (H) to
tighten.
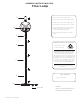
Point (F)
A
B
C
D
E
G
H
PARTS DIAGRAM:
IMPORTANT SAFETY INSTRUCTIONS:
This portable lamp has a polarized plug (one
blade is wider than the other) as a feature to
reduce the risk of electric shock. This plug will fit
in a polarized outlet only one way. If the plug does
not fit fully in the outlet, reverse the plug. If it still
does not fit, contact a qualified electrician. Never
use with an extension cord unless plug can be
fully inserted. DO NOT ALTER THE PLUG.
GENERAL PRODUCT INFORMATION:
This product is suitable
for dry locations only.
BULB TYPE: (3) 40 watt ST58 vintage bulb
( included) .
LISTED
C
R
L
U
US
(3) ST58 vintage bulb
Caution:
Don’t touch the bulb with your
hand when using the lamp.
Floor Lamp