
Manual


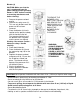

Blender (8)
CAUTION: Make sure that the
unit is unplugged from the
power source and the operating
button is “OFF” before inserting
or removing attachments and
before cleaning.
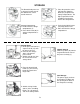
1. Remove the processor bowl
and lid.
2. Remove the safety cover (2).
This can only be done once the
processor lid has been
removed.
3. Place the blender (8) into its
location on the processor body
with the handle to the left.
Turn counter clockwise until
the blender clicks into place
and the arrows are aligned.
Warning: Use extreme caution -
blades are sharp. Handle
carefully.
4. Place food in blender.
5. Place the blender lid (9) and
the measuring cap (10) on the
blender.
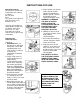
6. Replace the processor bowl
and processor lid. Ensure that
the lid tab has clicked into
place. The blender will not
operate if the processor lid is
not clicked in place.
7. Plug in the processor.
8. Always operate the blender
with the lid in place.
TO REMOVE THE
BLENDER, YOU
MUST FIRST UNLOCK
AND REMOVE THE
PROCESSOR LID (A).
THEN UNLOCK ANS
RMOVE THE
BLENDER (B) BY
TWISTING
CLOCKWISE.
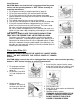
WARNING:
ALWAYS REMOVE
THE BLENDER AND
FIT THE SAFETY
COVER (2) INTO THE
RPOCESSOR BODY
(1) WHEN USING THE
PROCESSOR.
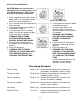
CAUTION: Never operate the blender with more than 42 oz. (1250 ml) of liquid or when empty.
• Recommended speed levels for blending are between 5 - Max.
• Do not overload past the MAX level on the blender.
• You can crush 10 oz. of ice cubes in 15-20 seconds in the blender.
• To prevent spilling, do not operate the blender with more than 42 oz. (1250 ml) of liquid.
• Avoid contact with moving parts at all times.
• Do not blend boiling liquid.
• To reduce the risk of severe injury to people or damage to the blender, keep hands, hair,
clothing as well as spatulas and other utensils out of container while blending.
9