
Operation Manual


10
Our products are engineered to meet the
highest standards of quality, functionality and
design. We hope you thoroughly enjoy your
new Braun appliance.
The Braun K 3000 is a kitchen machine system
which fulfils highest demands for kneading,
mixing, stirring, whipping, chopping, slicing,
shredding and grating, simply and quickly.
Read all instructions carefully before using
this product.
Important
• The blades o and s are very
sharp!
Take hold of the blades by the knob only.
After use, always first remove the blade from
the bowl before removing the processes
food.
• Keep the appliance out of the reach of
children.
• This appliance is not intended for use by
children or persons with reduced physical or
mental capabilities, unless they are given
supervision by a person responsible for their
safety. In general, we recommend that you
keep the appliance out of reach of children.
• This appliance was constructed for
household use only to process the listed
quantities.
• Do not use any part in the microwave oven.
• Do not allow the appliance to operate
unsupervised.
• Braun electric appliances meet applicable
safety standards. Repairs or the replace-
ment of the mains cord must only be done by
authorised service personnel. Faulty,
unqualified repair work may cause
considerable hazards to the user.
• Switch the appliance off and disconnect from
the mains before storing.
Basic unit (see page 4)
1 Motor block
2 Cord store
3 Control lamp for safety fuse
4 Motor switch (constant operation/
on: «I/on», off: «off/0»,
automatic pulse: «auto.pulse»)
5 Press button for manual pulse
6 Electronic speed regulator
(variable 2 –14, also with pulse mode)
7 Kneading attachment
8 Drive arm
H Mixing attachment
h Whisk attachment
9 Spatula
j Filling tube
Lid
l Dough bowl (stainless steel)
Safety fuse
The control lamp 3 flashes to indicate that the
motor is overloaded and will soon switch off.
As soon as the safety fuse has switched off the
motor, the control lamp 3 is constantly lit up.
Turn the appliance off with the motor switch 4
(switch position «off/0»). Wait approximately
15 minutes to allow the motor to cool off. Then
switch the appliance on again using the motor
switch
4 (position «I/on»). If the control lamp 3
should light up again and the motor does not
start, repeat the cooling procedure as
described above.
Important: lf the motor has automatically
switched itself off because of an overload, the
appliance can only be switched back on with
the motor switch 4 if it had been switched off
(position «off/0») with this switch before.
Speed regulator
It is recommended to select the speed first with
the variable, electronic speed regulator 6 and
then switch on the appliance in order to work
with the desired speed right from the beginning.
Recommended
Attachment speed range*
—————————————————————
Dough bowl
Whisk attachment 7 ... 14
Mixing attachment 5 ... 14
Kneading attachment 2 ... 7
Food processor bowl
Blade 7 ... 14
- Discs 2 ... 14
Glass liquidiser goblet
7...14
* see table on front panel of housing
Pulse mode
The pulse mode is useful for the following
applications:
• Carefully adding flour to doughs so as not to
affect their creaminess.
• Adding whipped eggs or cream to more solid
food.
• Chopping delicate and soft food, e.g. eggs,
onions.
Turn the motor switch
4
to the «auto.pulse»
position in order to start the automatic pulse
mode. This causes short bursts of operation
of identical length at the chosen speed. The
function «auto.pulse» is switched off by
switching the appliance off (motor switch 4
at «off/0»).
The manual pulse mode «pulse
•
» is operated
by pressing the button 5 when the appliance is
switched off (motor switch on «off/0»). Using
the manual pulse mode, you can vary the length
of the pulses. The appliance operates at the
chosen speed as long as the button
5 is
pressed down. When the button is released, the
motor will stop.
Caution: max. 15 pulses per minute
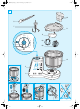
Attaching and removing the dough
bowl and the lid
Please clean all parts before using for the first
time (see paragraph «Cleaning»).
For safety reasons, always carry or lift the
appliance with both hands.
Ö Place the bowl l onto the motor block 1 so
that the markings on the bowl match those
on the motor block. Turn the bowl clockwise
until it clicks.
Ü/á Push the attachment needed as far as
possible onto the drive shaft in the bowl.
à Place the lid on the bowl so that the arrow
on the lid matches the arrow on the bowl l.
Then turn the lid clockwise until the nozzle
(lug) on the lid enters the safety lock on the
motor block and audibly snaps into place.
To remove, turn the lid anti-clockwise.
The filling tube j has to be inserted into the
lid’s opening so that the higher rim is facing the
inside. It allows more convenient adding of
ingredients while processing.
Double safety lock: The motor can only be
started if both the bowl
l and the lid are
locked into place. The lid can only be removed
from the bowl, if the motor is switched off.
When the appliance is switched off, turn the lid
anti-clockwise and lift it off
. Take out the
attachment. Turn the bowl l anti-clockwise to
lift it off.
Cleaning
Always switch off the motor first and then
unplug the appliance before cleaning.
Clean the motor block 1 with a damp cloth
only.
Some types of food (e.g., carrots) can lead to
discolouration; wipe off first with cooking oil
before washing.
The kneading attachment 7 and the drive arm
8 should only be cleaned manually. Do not
immerse in water. All other parts can be washed
in the dishwasher at a maximum temperature of
65 °C.
Parts which are difficult to reach, e.g., the
indentation on the inside of the lid should be
well cleaned with the spatula 9 (e) and a brush
if necessary.
Do not use sharp objects for cleaning.
Care and cleaning instructions for
the stainless steel dough bowl
• Rinse in hot soapy water before first use.
• Rinse in hot soapy water as soon as possible
after use, especially after processing very
salty food.
• Stubborn food residues should be soaked
and removed with a sponge (do not use a
scouring pad) or brush.
• When cleaning in a dishwasher, remove the
stainless steel bowl from the dishwasher as
soon as the cleaning program is finished in
order to prevent stains from remaining water
drops. Be carefully to avoid an overdose of
cleaner and decalcifier.
• Carefully dry the bowl before storing it away.
Kneading
The kneading attachment 7 is specially
designed for making yeast dough, pasta and
pastries. It is not suitable for making cake
dough. For cake dough, use the mixing
attachment H.
Place all ingredients into the dough bowl l
after the kneading attachment has been
assembled.
Yeast dough (bread, cake)
Up to 1.5 kg flour plus ingredients:
Speed 2–7 3 to 5 minutes
First, place the flour and then all other
ingredients – except milk – into the dough bowl,
including raisins, candied peel and almonds.
A
11
11
11
11
11
English
98907297_K3000_S_6-64 Seite 10 Donnerstag, 7. Mai 2009 11:07 11