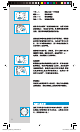
Series 7 trimmer Series 7 790 cc-4 99640597_790cc-4_China.indd 19 01.07.
3 4 4a 8 Series 7 9 10 5 on 6 trimmer trimmer 2 1 11 off 12 13 14 15 7 16 17 20 18 19 s7 rie Se er m trim 2 99640597_790cc-4_China.indd 2 01.07.
99640597_790cc-4_China.indd 3 01.07.
1 2 fast clean fast clean fast clean trimm er Serie s7 4 99640597_790cc-4_China.indd 4 01.07.
battery gie h y ne 5 99640597_790cc-4_China.indd 5 01.07.
battery ien hyg e battery ien hyg e + 6 99640597_790cc-4_China.indd 6 01.07.
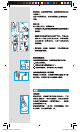
lo ck tr + 2 trimmer lock k loc 1 lock release er trimm 7 99640597_790cc-4_China.indd 7 01.07.
trim r me Series Series er release Series 7 release Series 7 trimmer release Series 7 release Series 7 release release 8 99640597_790cc-4_China.indd 8 01.07.
giene battery hy Series 7 70S mer rlee ase 70S 9 99640597_790cc-4_China.indd 9 01.07.
99640597_790cc-4_China.indd 10 01.07.
99640597_790cc-4_China.indd 11 01.07.
English STOP Our products are designed to meet the highest standards of quality, functionality and design. We hope you enjoy your new Braun Shaver. Warning Your shaving system is provided with a special cord set, which has an integrated Safety Extra Low Voltage power supply. Do not exchange or tamper with any part of it, otherwise there is risk of an electric shock.
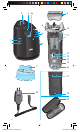
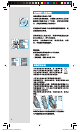
w e r t z u i o p On/off switch (–) setting button (sensitive) (+) setting button (intensive) Reset button Shaver display Shaver-to-station contacts Shaver power socket Travel case Special cord set Before shaving Prior to first use you must connect the shaver to an electrical outlet using the special cord set p or alternatively proceed as below. Installing the Clean&Renew station • Using the special cord set p, connect the station power socket 6 to an electrical outlet.
« « « « » » shaver is clean short economical cleaning required » normal level of cleaning required » high intensive cleaning required If the station selects one of the required cleaning programs, it will not start unless you press the start button 4. For best shaving results, we recommend cleaning after each shave. Whilst cleaning is in progress, the respective cleaning program indicator will blink.
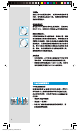
ien hyg e battery ien hyg e battery Battery segments: During charging or when using the shaver, the respective battery segments will blink. When fully charged all 6 segments are shown. With decreasing charge the segments gradually disappear. Low charge indicator: The low charge indicator provided with a red frame blinks to indicate that the charge has dropped below 20%. The remaining battery capacity is sufficient for 2 to 3 shaves.
For a thorough and fast shave we recommend the (+) setting. When switching on next time, the last used setting will be activated. tr How to use Press the on/off switch w to operate the shaver: lo ck • The pivoting shaver head and floating foils automatically adjust to every contour of your face. + 2 • To shave hard to reach areas (e.g. under the nose) slide the shaver head «lock» switch 0 to the back position to lock the pivoting head at an angle.
The cleaning cartridge also contains lubricants, which may leave residual marks on the outer foil frame after cleaning. However, these marks can be removed easily by wiping gently with a cloth or soft tissue paper. Manual cleaning The shaver head is suitable for cleaning under running tap water. Warning: Detach the shaver from the power supply before cleaning the shaver head in water.
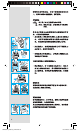
ry gie h y ne batte Keeping your shaver in top shape Replacing the Foil & Cutter cassette / reset To maintain 100% shaving performance, replace the Foil & Cutter cassette 8, when the replacement symbol lights up on the shaver display z (after about 18 months) or when cassette is worn. The replacement symbol will remind you during the next 7 shaves to replace the Foil & Cutter cassette. Then the shaver will automatically reset the display.