
Installation Guide

Step 1
•
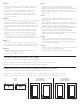
Decide where you would like to install your knobs and/or pulls. Common
locations are illustrated below.
•
For pulls, measure between the holes on the back to determine the correct
center to center hole spacing. 3” is the most common spacing but there are
numerous options to choose from.
Step 2
•
To prevent damage while drilling, place masking tape in the approximate hole
locations on the cabinet or drawer fronts prior to measuring.
•
Carefully measure and mark each hole location using a ruler or tape measure
and pencil.
•
For drawers, it may be helpful to measure down the same distance on either
side and lightly scribe a horizontal line with a pencil. Be sure to check for level.
•
Alternately, a reusable cabinet hardware installation template can be
purchased and used to ensure accurate placement. (Liberty AN0191C-G-Q1)
Step 3
•
Carefully drill through the drawer and/or door fronts. Be sure to go slow and
use minimal pressure to reduce splintering on the backside of the surface.
Step 4
•
Install the new cabinet hardware using a screwdriver and the fasteners
provided.
•
Be careful not to over tighten the screws.
Before You Begin
•
Read the installation instructions
completely before starting.
•
Take care not to scratch your
cabinets and countertops while
working with tools.
Avant de commencer
•
Lisez toutes les instructions
d'installation avant de commencer.
•
Faites attention à ne pas rayer vos
armoires et comptoirs lorsque vous
travaillez avec des outils.
Antes de comenzar
•
Lea completamente las instruccio
nes de instalación antes de comenzar.
•
Tenga cuidado de no rayar los
gabinetes y los mostradores mientras
trabaje con herramientas.
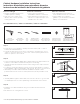
Recommended Tools / Outils recommandés / Outils recommandés
#2 Phillips Screwdriver
Tournevis cruciforme n° 2
Destornillador Phillips #2
Pencil
Crayon
Crayon
Electric Drill
Une perceuse électrique
Taladro eléctrico
3/16 in. Drill Bit
Regla o cinta de medir
Broca de 3/16"
Ruler or Tape Measure
Règle ou ruban à mesurer
Regla o cinta de medir
Installation Template (optional)
Gabarit d'installation (optionnel)
Plantilla de instalación (opcional)
Masking Tape (optional)
Ruban-cache (optionnel)
Cinta adhesiva (opcional)
1
2
4
3
©2010 Liberty Hardware Manufacturing Corporation, A MASCO COMPANY
Cabinet Hardware Installation Instructions
Instructions d'installation pour quincaillerie d'armoire
Instrucciones de instalación de la ferretería del gabinete